Do you want to learn how to remove background in Photoshop? Then you have come to the right place. We have created a detailed guide to help you learn this new skill. In this tutorial, we are going to discuss in detail how to remove background from an image in Photoshop. We will use learn how to use the Pen Tool to make the background of an image transparent. We will also discuss where you can use images after making them transparent. This guide is designed for beginners, but more advanced users can also use this to learn something new. You can follow the steps and remove the background from an image using Pen Tool. Let’s start.
Why do you need to remove the background in Photoshop?
The first thing you need to understand is why you need to remove background from an image in Photoshop. There are many reasons why you might want to make the image transparent.
Sometimes you need to use a logo in your design but it has a white background that might look bad when used in your design. Or you might need to add a product photo on your site without a cluttered background. You might also need to merge two photos together and add the same background.
At times like this, you need to learn how to remove background from an image. This might sound hard, but it is actually pretty easy.
There are several tools that you can use to remove the background of an image from Photoshop. Some are easier to use, while other ways are a little time-consuming. But the best tool for this purpose is the Pen Tool in Photoshop. We will later take a look at how you can remove background from an image using Pen Tool.
So, if you ever want to make your image look sharp, use a graphic in your design, or create a collage, you can remove the background from an image in Photoshop before using it in your final product. This can make your designs and images stand out.
How to remove background in Photoshop?
Photoshop comes with a lot of tools that can help you remove background from an image. With a wide range of selection tools available in Photoshop, you have a free choice to pick any tool you want. But if you are a beginner, this might get a little confusing for you.
We will briefly look at some of the most commonly used methods of removing background from an image in Photoshop and you can decide which one you want to use.
- Magic Eraser Tool: One of the most popular tools, Magic Eraser Tool can make any image transparent simply by clicking on it. You might need to click several times to get all of the background regions.
- Background Eraser Tool: This tool works the same way as the Magic Eraser Tool but was built specifically for the background portion of an image. Simply click on the background and watch it disappear.
- Magic Wand Tool: This tool allows you to select portions of an image. You can easily control parts of the image you want to be removed. All you have to do is to select the background and delete it from the keyboard.
- Lasso Tool: Lasso Tool is one of the selection tools that can remove the background from an image. This tool selects closely around the boundary of an object. You can then inverse the selection, and simply delete the background portion from any image.
- Pen Tool: Pen Tool is the tool most advanced users prefer to use when removing background from an image. In the next section, we will take a look at a detailed guide for its usage.
Removing Background using Pen Tool
Let’s take a look at how you can remove background from an image using the Pen Tool:
Step-1: Open the Image
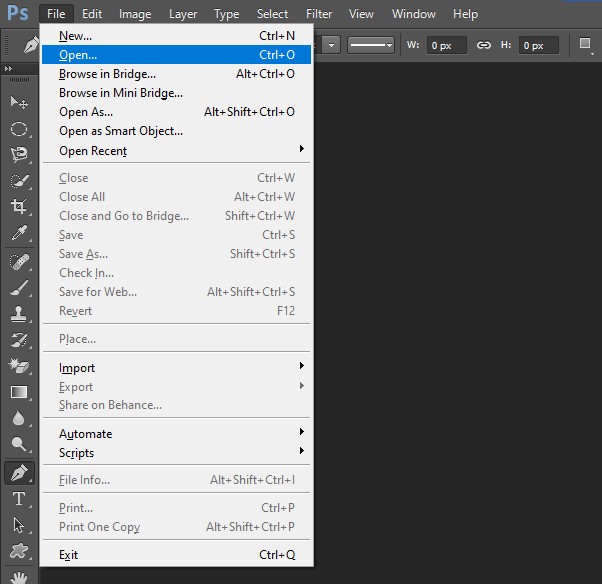
The first thing you need to do is to open the image in Photoshop. You can open the image that you want to remove background from by clicking on File-> Open. Browse your computer, select the image, and click open.
Step-2: Pick the Tool
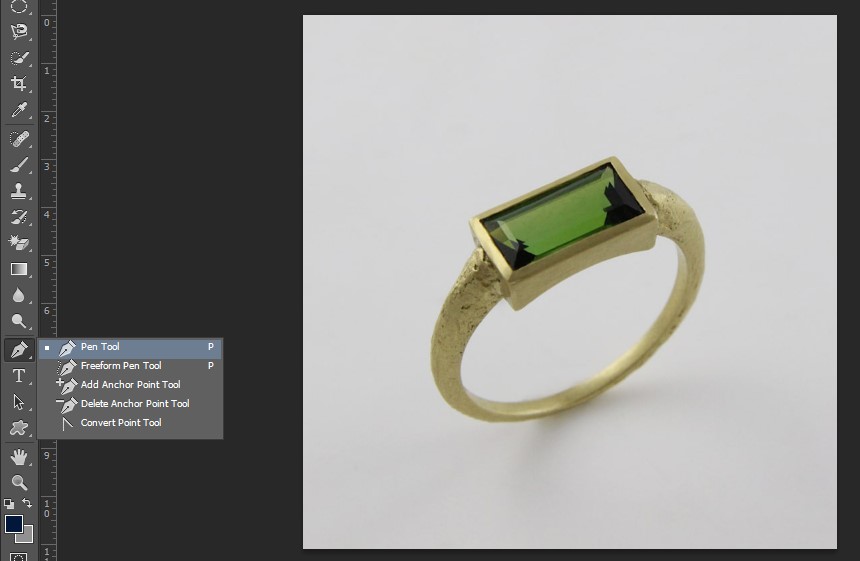
Now, pick the Pen Tool from the side menu. This is what we are going to use to remove background from the image. The Pen Tool icon is easy to spot. Click on it to select it, or hot the shortcut ‘P’ on your keyboard.
Step-3: Draw a Path
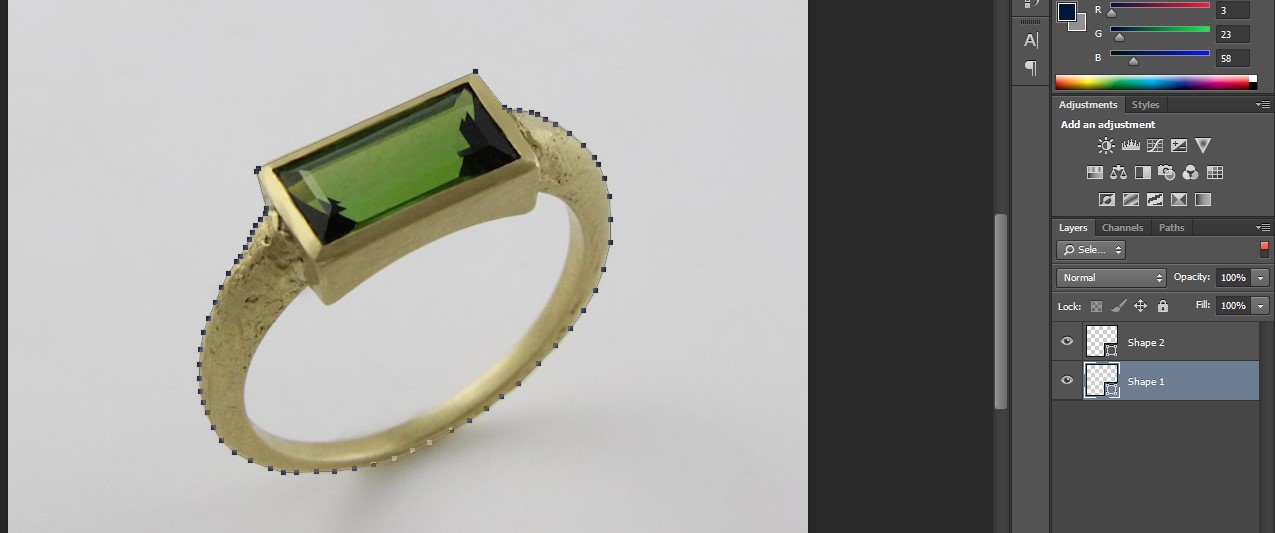
Once you have selected the Pen Tool, you can now draw a path around the image to select it. First, zoom in to your image. Add anchor points. This is a little time-consuming, so be patient. You can also remove it if you add an anchor point by mistake.
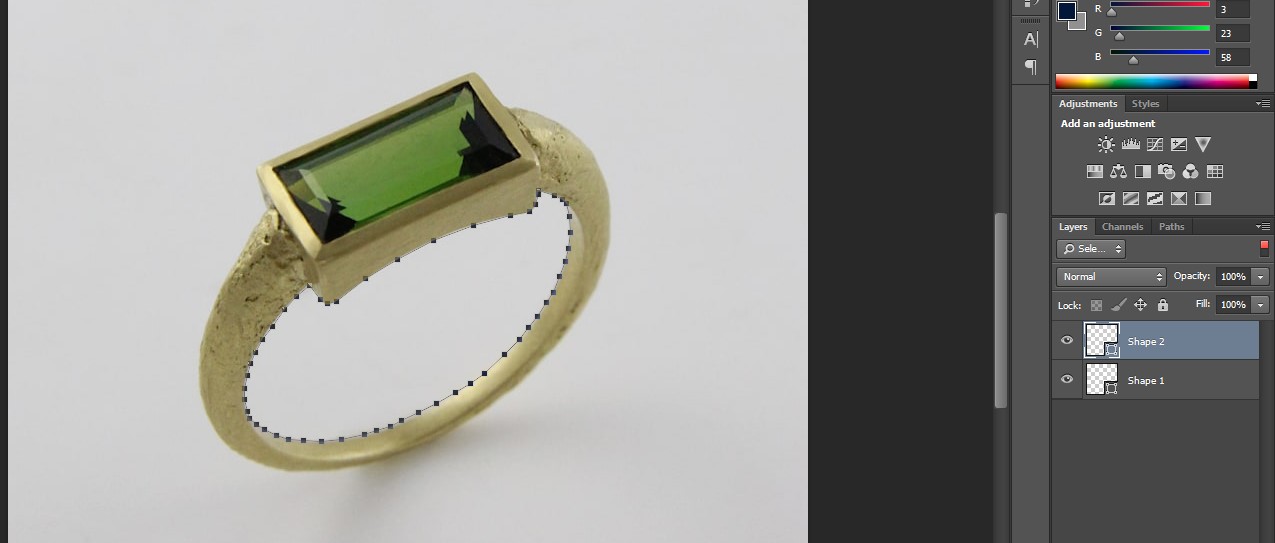
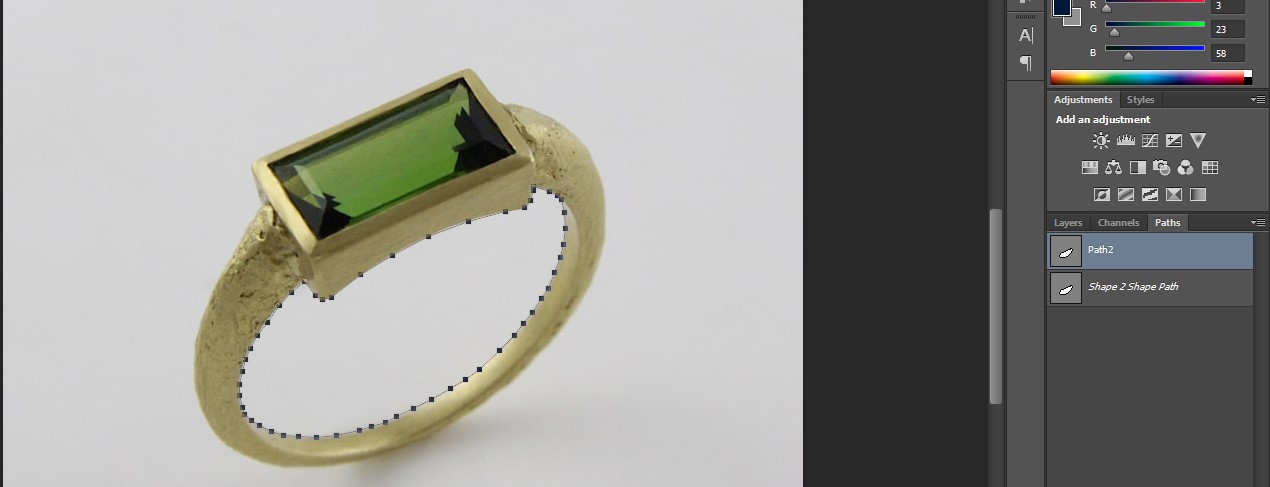
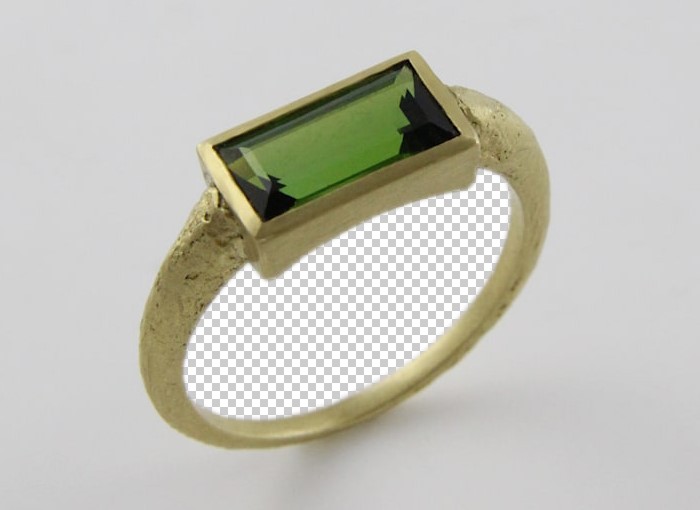
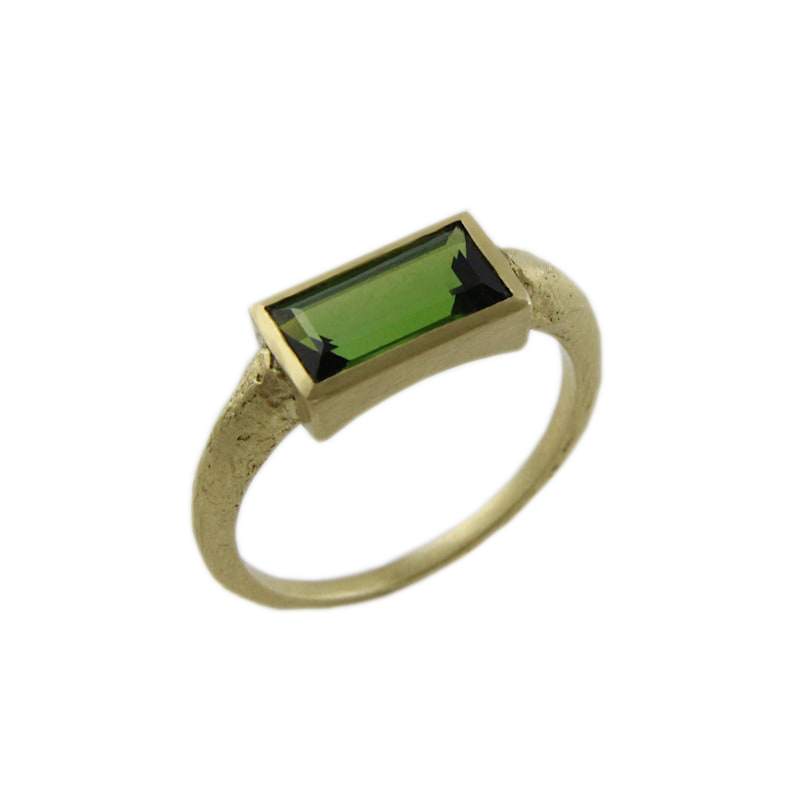
In case your image has close boundaries, you might need to add another path to remove the background from inside the image boundary, such as for a ring:
Step-4: Rename Path
Now that you have completed your path, go to the Paths panel. If you are unable to view the panel, go to Windows -> Paths. Check it to view your paths. Now rename your path for your ease. You can also skip this step if you want.
Step-5: Convert to Selection
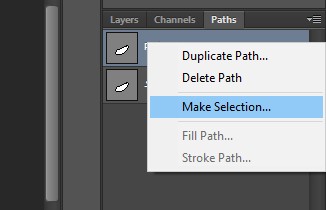
The next step is to convert the path you drew with the Pen Tool to a selection. You can do this by right-clicking on the path in the Paths Panel. Now click on the option that says “Make Selection”.
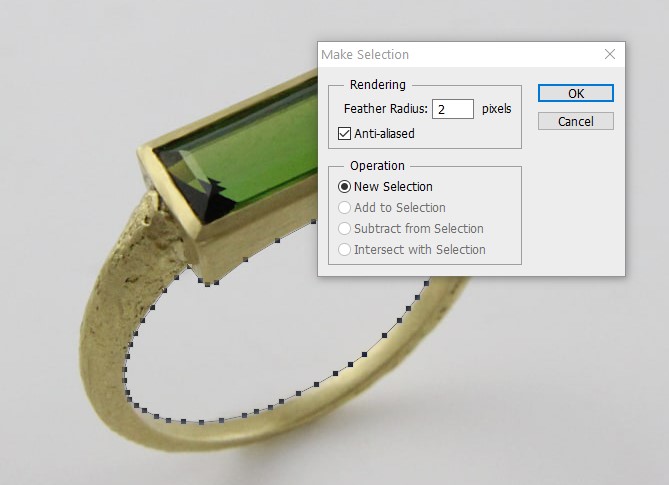
You will then see a message box that will ask you for the value of Feather. Feather is the softening of image sides. You can choose a suitable value such as 10 and click OK.
Step-6 Inverse Selection
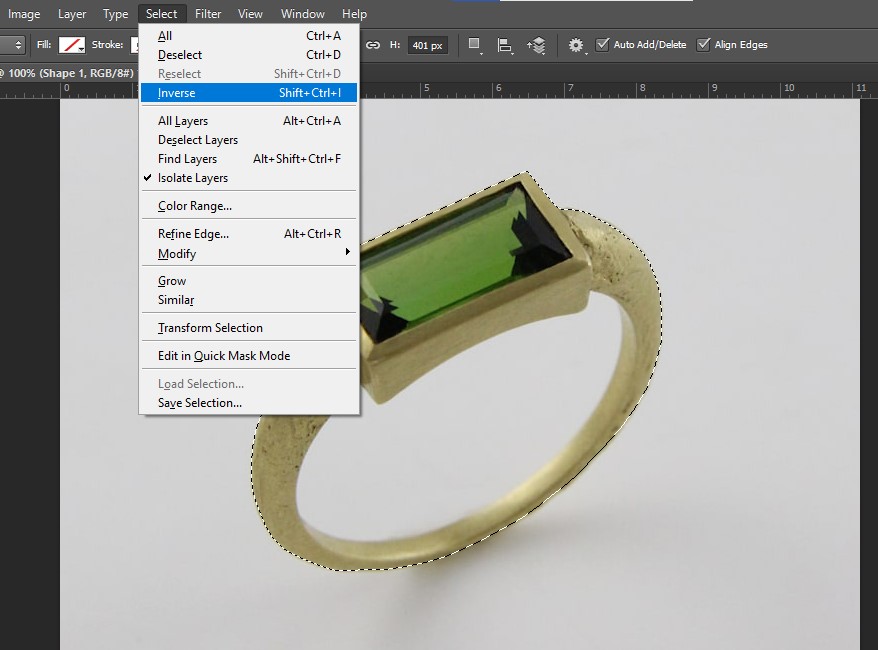
If you have selected the outer boundary of the image, you might need to do an extra task after converting the path to selection. Go to Select -> Inverse. This will select the background and make it easier to remove.
Step-7: Duplicate Background Layer
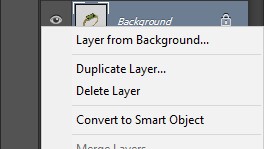
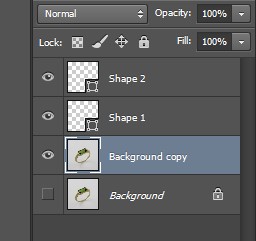
Once you have converted the path into a selection, it is pretty easy to remove it. But first, you might need to duplicate the background layer. Simply click on the background layer and find the option that says Duplicate Layer.
Now turn off the visibility of the original layer.
Step-7: Delete Background
Now, all you need to do is to hit delete on the keyboard to remove the background.
Repeat the same for the other path, inverse selection, and hit delete.
Why is Pen Tool the Best Tool for Removing Background?
While the other tools such as Background Eraser Tool and Magic Wand Tool, are quick and easy to use, they are not very good at preserving the quality and details of the image. On the other hand, the Pen Tool is a little time-consuming to use, and you need the practice to get a good grip over the mouse to use it. So it’s one of the best tools for background remover. But it allows you to closely background remover from any image.
You can zoom in and add anchor points to draw a close boundary around the image. This allows you to get all the minute details in the image. This makes Pen Tool one of the best options for removing background from an image in Photoshop. It is also the tool advanced users and graphic designers prefer.
If you are a beginner, you might feel a little overwhelmed using the Pen Tool to remove background from an image. But with a little practice, you can become an expert in it.
Where Can You Use the Image after Removing Background?
Now that you have removed the background from an image using the Pen tool, you must be wondering where you can use this image. Let’s take a look at how you can use an image with a transparent background.
Photo editing: You can merge multiple photographs together after removing the background from them and selecting only parts of the image. With the Pen Tool, you can make the final product look as realistic as possible.
Graphic Design: Another way you can use an image with a transparent background is in graphic design. Whether you want to add a logo over your poster or add any other graphic, you have to first make it transparent to use it.
Product Images for Web: When you are uploading product images on the web, you might find the background too messy or distracting. You can always remove the background using Pen Tool and add a colored background of your choice to make your product photos pop.
Architecture and Designs: Finally, you can also use an image with a transparent background in preparing an architectural design or interior design for the clients.
There are several other ways you can use an image with a transparent background. All you have to do is to keep practicing and learning how to remove the background from an image using Pen Tool.
Video tutorial
Final Verdict
In this tutorial, we tackled a topic that confuses most beginners- how to remove background from an image. We looked at all aspects of removing backgrounds in detail. We also discussed why you might need to remove background in Photoshop, and how you can use an image with a transparent background in your designs.
We hope the detailed guide on how to remove background from an image using Pen Tool was helpful for you. The step-by-step guide can help new users master the Pen Tool method. While we looked at several ways you can remove background, we concluded that the Pen Tool is the best option there is.
If you are new to this, don’t worry, you should follow our guide and practice using the Pen Tool to remove background from an image. Before you know it, you will become a pro at it.

