Python Server Monitoring Script enables you to monitor if your server or computer is active and running. It can show you how much downtime your computer or server had. We will be using server sockets to check if the specific port on a server is open or not, the Ping command to monitor a simple regular computer and the SSL to check if the particular server requires an SSL connection or not. For Server monitoring, I have been using the Visual Studio Code Interpreter tool.
Create File Python.py
Open the Python interpreter and create a new file named Server.py and saved it in a particular location where it can be accessed easily. When the file has been created, add some import commands to import important packages as follows:
- Socket: To connect with different servers on a certain socket by a particular port
- SSL: Required for the wrapping of the socket connection
- DateTime: Used to check what time the server was down or active
- Pickle: Used for saving the history of the computer’s down and uptime, as well as propagate the data from run to run with this program
We are using the platform and subprocess packages, that will tell us which operating system we are running, e.g., UNIX or Windows.
Create a Server Class
Let’s create a class named Server() and built a first method, which is a constructor method. We have added some attributes for the server, e.g., any UNIX or regular computer. Let’s have a look at each:
- Name: specify the name of a server
- Port: the port number to which we want to connect
- Connection: tells the connection type, e.g., SSL or ping
- Priority: tell us the server priority, e.g., you can set alerts if you set priority
- History: to keep server history list
- Alert: If you want to send alerts to your email
Create a Method to Check Connection
So to test the server connection, we have created another method in Server() class named check_connection(). In this method, we have to define three variables as:
- Msg: used to display a message if connection established or failed which is initially empty
- Success: used to tell if the connection is successful or not
- Now: will get the current date and time while checking the connection
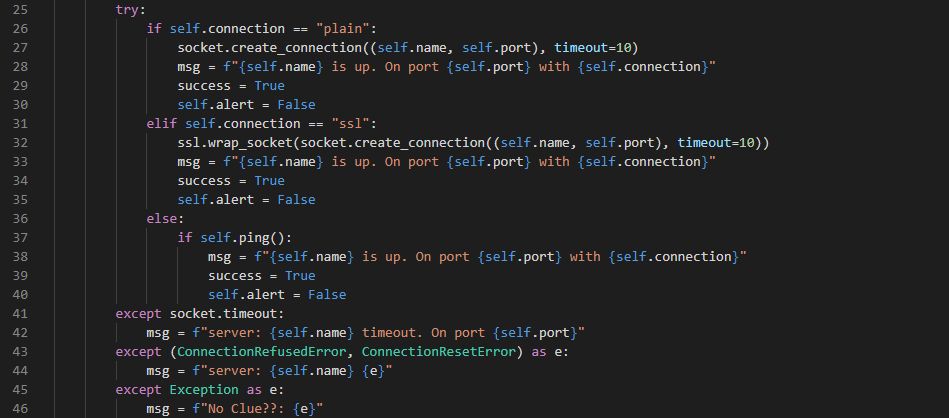
Now write the below code in the same file, and using the try statement, we are checking the connection for different servers connection types, e.g. plain, SSL, and ping. In this try statement, we have if statement having a connection of plain type. It will create a connection with the provided name and any port number you provided. If the connection is successful, it will generate a success message, e.g., msg. It will turn the Success variable to True and no alert will be sent to email. We have else if statement with a different connection type, and in the last if statement we have a ping() function called. In the except statement, if the socket has run out of time, a connection is refused, or anything else, it will display a failure message.
On the other hand, if the success status and alert are False, it will change it to True and send an alert to the provided email and call the create_history() function to create a history.
Define a Method to Create History
In the create_history() method, we have appended some attributes with maximum limit defined, and if the history limit exceeds, it will delete the older one.
Define Ping Function to Connect
The ping() function will ping the server or computer. If the ping is successful, it will output True, and if the connection failed, it will return False.
Create List of Servers
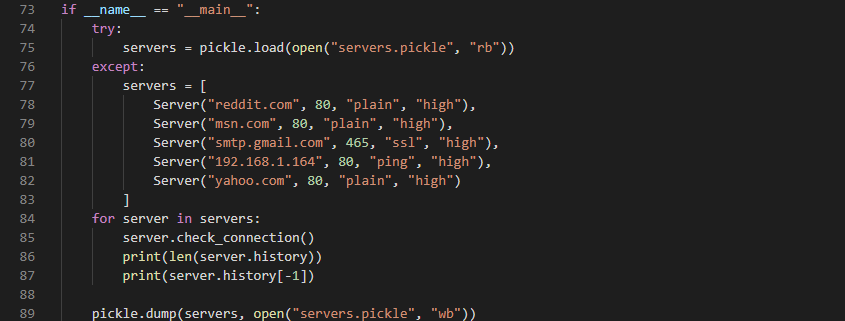
Now we have to make sure that we are running the main program. The If-statement will check if it is the main program or not. The try statement will load the server pickle file if it already exists. If it does not exist, the except statement will get a whole new list of servers. For any of the servers, connections will be checked and history will be saved. On the other hand, we have to save our data to the pickle file using the dump statement.
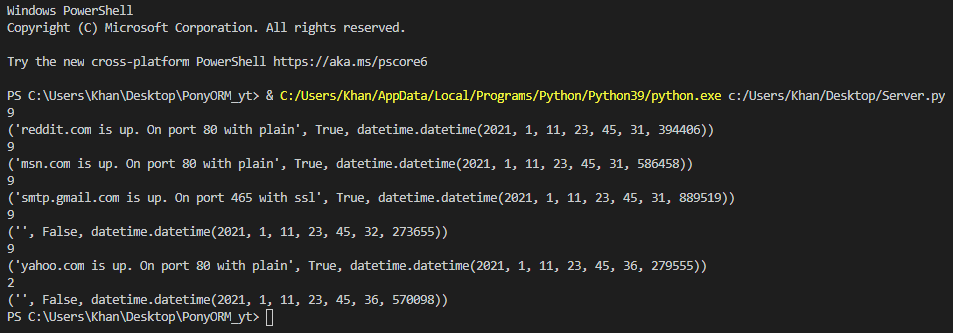
The below output will be shown while running this file.
Create File for Adding information
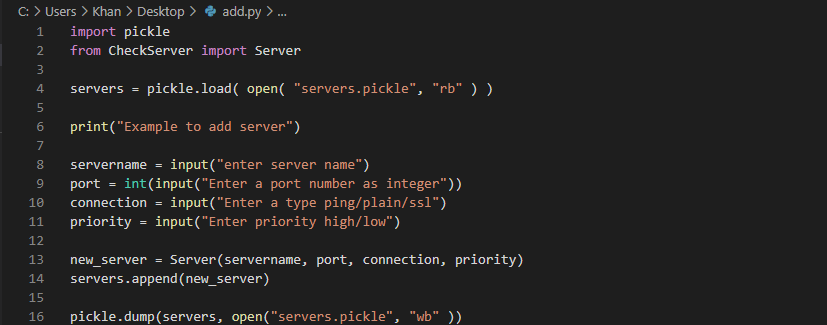
Create a new file named add.py and import pickle package and class Server from the old file Server.py. This file will open the pickle file and will ask you to add some additional information regarding the server as code is shown below.
When you run this file, you will get the below output and it will ask you to add server name, port, ping type, and priority.
While, when you run the Server.py file again, you will get the information regarding the old server, as well as the history of the new server you have provided in the above image.
Create File for Gmail Alerts
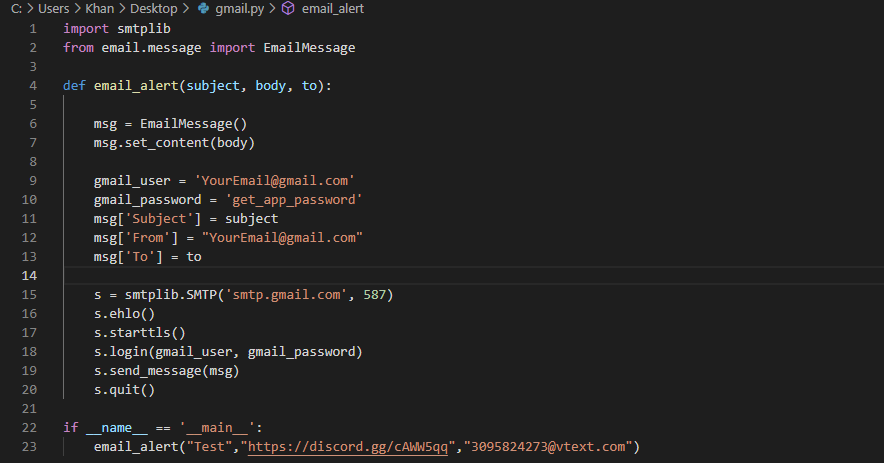
Now create a new file named gmail.py and import some packages required. Then create a method named email_alert() that creates an alert to send on the email while providing email and password information.
Now go to the Server.py file and import the email_alert() method from the gmail.py file.
You can add your email address wherever required in the code. Now run the Server.py file and check the output shown in the terminal of the Python interpreter.
Create A File to Get Statistics
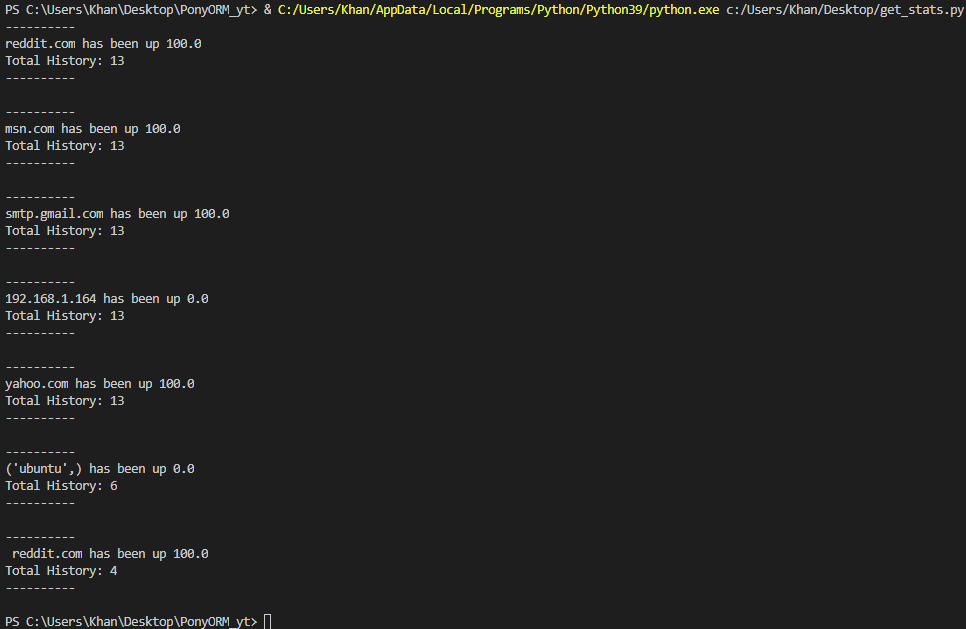
Now you have to create another python file named get_stats.py within the same directory. This file has imported the Server class from the Server.py file. The code written below will look upon our pickle file, which is loaded in, and print the history of each server and how much that particular server has uptime.
When you run this particular file, you will see a total history of each server and their uptime as well.
Conclusion
We have successfully tried and learned the Python server monitoring script in our Visual Studio Code interpreter to get information regarding several servers.


