Objectives
By the end of this seesion you will be able to:
- alter the prompt to display the current working directory
- set the prompt to a chosen colour
- create and use aliases
- save customisations such as the prompt and aliases
- use the history feature
- use command completion
Home Directory – HOME
Linux uses a set of upper case environment variables, rather like pidgin holes, which are automatically populated, to store information. The complete list can be viewed as follows:
I’ve piped into more here rather than less so that the command can be seen in the screen dump.
The name of a user’s home directory, usually /home/username (/home/kdm in my cae), is stored in the environment variable HOME; note that most environment variables are in upper case.
We use a $ when referencing an environment variable to specify that it is a
variable name and not a string. To view the variable HOME enter:
Linux is full of shortcuts and the character tilde, ~, is a shortcut to HOME. It can be used instead:
Working Directory – PWD
The command pwd may be used to find out which is the current working directory. When a user logs in, this is their HOME directory as defined in the /etc/passwd file. Here we display just the last two lines of the file and the current path for the user kdm:
$ pwd
Changing Directories – cd
The command cd may be used to change the current working directory.
For example, to move to the root directory:
# the ; character allows two commands on one line
To move to the directory /etc:
To move back to the previous directory use the command:
To move back to the HOME directory, use the command cd without any options:
Command Prompt – PS1
When using the cd command to change directories it is not always obvious what the current directory is. The Bash shell allows the prompt to be customised.
The default command prompt is stored in a system variable, PS1; this is entered in upper case. To view the variable enter:
Note that the ‘$’ displayed is not the prompt but the content of the variable!
The following special characters may be used to alter the prompt:
- \s-\v current shell and version
- \w current working directory
- \[email protected]\u host and user name
- \[email protected]\t current date and time
For example, to set the prompt to the current shell and version use:
The prompt now appears as bash-5.0: .
Current Directory – $PWD
To save constant use of the pwd command, the prompt may be set to the full path name of the current directory, a concept familiar to DOS users. To do this, carefully type the following in upper case:
The prompt changes to be the current working directory, in this example
Now change directories and note how the prompt changes.
/: cd /etc
/etc: cd
We can now see which directory we are in without recourse to the pwd command.
Adding Colour
A colour, in this example yellow, can be added as follows:
I usually have my prompt set to the current directory, reserving the colour red (alter 33 to 31 in the command above) for when I am using root. However, for the examples to follow I will revert to the ‘$’ sign.
Secondary Prompt – >
The secondary prompt is also stored in a system variable, PS2, also in upper case. To view this variable enter:
This prompt will be seen if an incomplete command is entered, for example:
In this example the second quote symbol is missing. To correct this situation, complete the command or enter CONTROL & C and re-enter the command.
Files or Directories?
When the contents of a directory are displayed it is not always obvious if the entries are files or directories.
With the option -F, often used on UNIX servers, the entries displayed are followed by an extra character. For example, try:
These extra characters include the following and denote:
- directory /
- linked file @
- executable file *
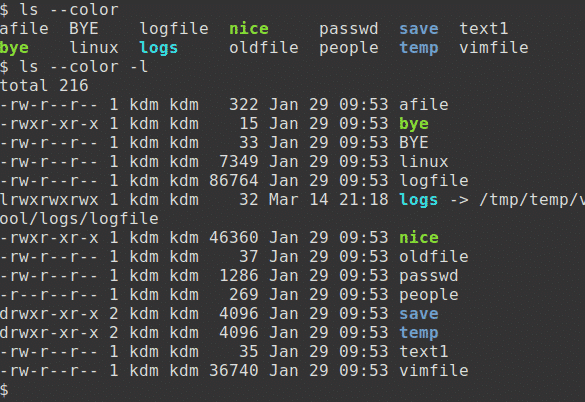
Linux systems support colour coding of directories and files. Colours may be on by default. If not try the following (use a double hyphen):
These extra colours include the following and denote:
- directory blue
- linked file cyan
- executable file green
Creating Aliases
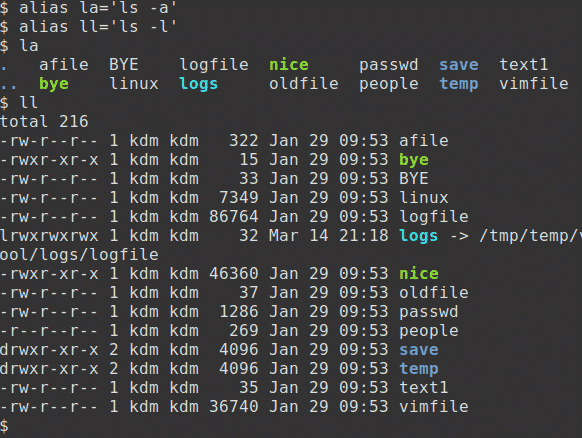
On some systems useful commands such as la, which runs the command ls -a and ll which runs the command ls -l are available. However, if these commands are not available, an alias can be created to achieve the same result. Some aliases may be defined automatically when a shell is started.
An alias can be created for any frequently used command. This saves having to type the full command and its options. For example, if colours are not in use with ls:
$ ls
These two examples show files in the /etc and /bin directories. The -d option shows only directory entries not the files in the directory:
$ ls -d /etc/u*
Common Aliases
Comman aliases include the following to the remove, copy and move commands. These aliases make the command interactive so you can choose to take an action or not:
$ alias cp=’cp -i’
$ alias mv=’mv -i’
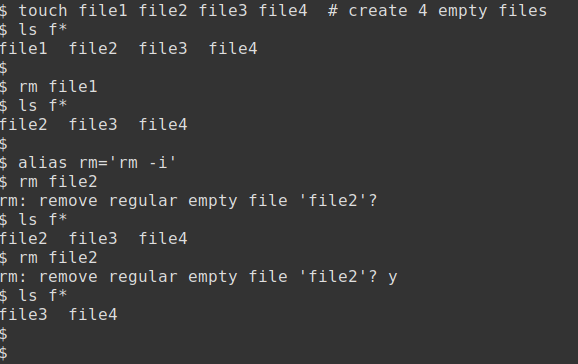
In the example shown here, four empty files are created. The first, file1, is then removed. An alias is then created for rm and file2 is removed interactively:
The actual command name does not necessarily have to be used for the alias name. Note that these examples use the alias to ls created above:
$ alias ll=’ls -l’
$ la
$ ll
Using Aliases
To display a list of aliases, use the alias command. It is very likely that you will already have several aliases by default:
A command can be invoked without the use of the alias by prefixing the command with a backslash, \ . This is particularly useful if an alias to rm -i exists and you want to remove many files!
$ \ls
To remove one or more command aliases use:
$ alias
Saving Customisations
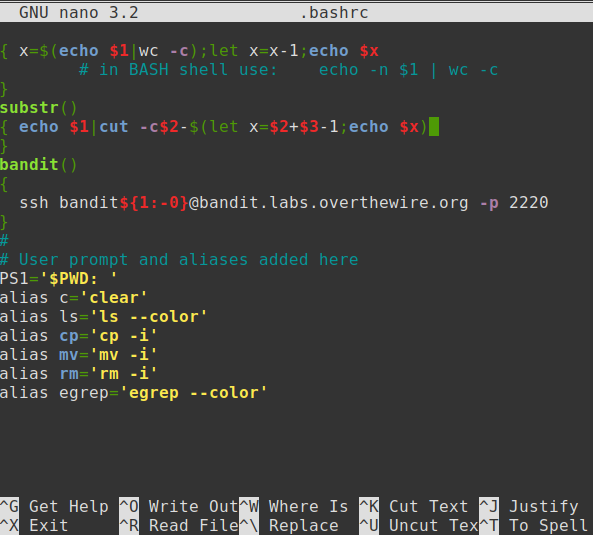
One drawback when altering the prompt or adding aliases is that these settings are lost when the user ends the session. This problem can be overcome by saving the settings in a set up file. The Bash shell stores variables and aliases permanently in one of several hidden files, files beginning with a full stop.
Here, I will use the simple editor nano (vim may be used instead) to update the hidden file .bashrc so as to configure the environment.
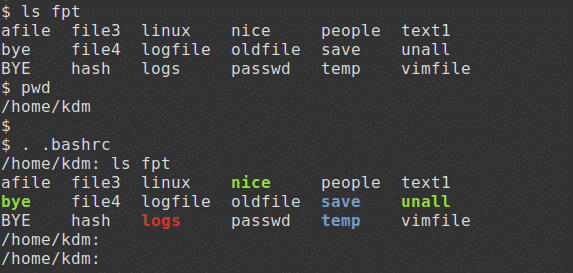
I have added my changes to the end of the file, have altered the prompt and added several of my favourite aliases:
To save the changes and exit, enter Control & X.
The dot Command – .
The new .bashrc file may be tested by opening a new session or by logging out and in again. As an alternative the file may be tested thus:
The dot (.) command runs the contents of the file in the current shell.
Command History
The command history feature maintains a list of recently used commands in the file .bash_history and provides a shorthand for re-executing any of these commands.
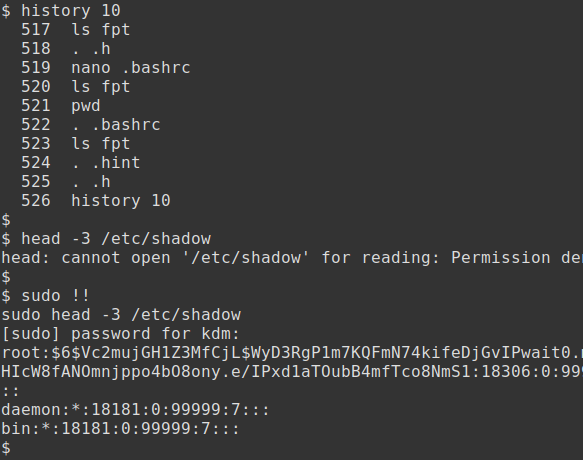
To view the last 10 commands, type:
To re-execute the last command use !!. For example:
$ sudo !!
Edit Command Line
Control keys used to edit previous command line entries include the following:
- Control & R Reverse history search
- Control & A Go to start of line
- Control & E Go to end of line
- Control & G Cancel search and restore original line
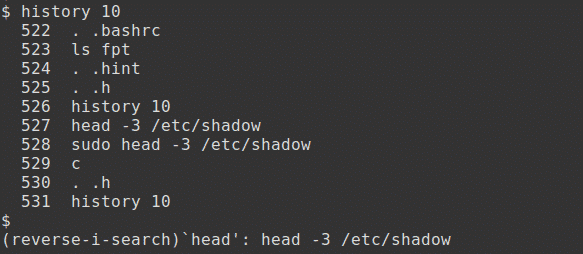
In this example I use Control & R (twice) to do a reverse search for the head command. Pressing enter will then run the command:
Command Completion
In the Bash shell the key sequence TAB TAB may be used to complete a file name used in a command provided that an exact match exists.
To try this, first change to the directory /bin:
Type the following command but don’t press enter yet:
Now press the tab key twice. A list of all files that start with the character will be displayed.
Add characters to the command to invoke a unique name, but again don’t press enter yet.
Now press the tab key. The command will automatically select the correct file.


