Elasticsearch Database
Elasticsearch is one of the most popular NoSQL databases which is used to store and search for text based based data.
Elasticsearch is based on the lucene indexing technology and allows for search retrieval in milliseconds based on data that is indexed. It supports database queries through REST APIs. This means that we can use simple HTTP calls and use HTTP methods like GET, POST, PUT, DELETE etc. to access data.
Installing Java
To install Elasticsearch on Ubuntu, we must install Java first. Java might not be installed by default. We can verify it by using this command:
When we run this command, we get the following output:
We will now install Java on our system. Use this command to do so:
sudo apt-get update
sudo apt-get install oracle-java8-installer
Once these commands are done running, we can again verify that Java is now installed by using the same command.
Installing Elasticsearch
Now, installing Elasticsearch is just a matter of few commands. To start, download the Elasticsearch package file from ES page:
When we run the above command, we will see the following output:
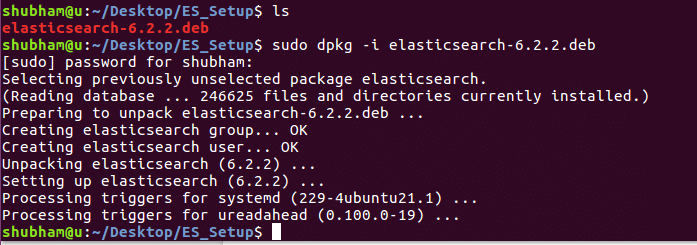
Next we can install the downloaded file the dpkg command:
When we run the above command, we will see the following output:
Make sure that you download the deb package only from the ES website.
The config files for Elasticsearch will be stored at /etc/elasticsearch. To make sure that Elasticsearch is started and stopped with the machine, run the following command:
Configuring Elasticsearch
We have an active installation for Elasticsearch now. To use Elasticsearch effectively, we can some important changes to the configuration. Run the following command to open the ES config file:
We first modify the node.name and cluster.name in elasticsearch.yml file. Remember to remove the # before each line you want to edit to unmark it as a comment.
Modify these properties:
Once you’re done with all the config changes, start the ES server first time:
When we run this command and check the service status, we get the following output:
Using Elasticsearch
Now that Elasticsearch has started, we can start using it for our commands.
To see the instance details and the cluster information, run the following command:
You may have to install curl, do it so using this command:
When we run this command, we get the following output:
Now, we can try inserting some data into ES using the following command:
/json' -d '{ "name" : "LinuxHint" }'
When we run this command, we get the following output:
Let’s try getting the data now:
When we run this command, we get the following output:
Conclusion
In this quick post, we learned how we can install Elasticsearch and run basic queries on it.


