SELinux can seem daunting and very hard to implement in most modern systems. However, configuring SELinux has huge benefits both in enforcing security and troubleshooting.
This tutorial will discuss various concepts implemented by SELinux and explore various practical methods of implementing SELinux.
NOTE: Before we begin, it is good to use the commands in this tutorial as the root user or a user within the sudoers group.
Install SELinux Packages
Let us install various SELinux packages, which in turn will help to work with SELinux policies.
Before we proceed to install the SELinux packages, it is good we verify which are installed on the current system.
In most installations of REHL distributions, some packages are installed by default. These packages include:
- setools – this package is used for monitoring logs, querying policies, and context file management.
- policycoreutils-python – provides python core utilities for managing SELinux
- policycoreutils – this package also provides utilities for managing SELinux.
- mcstrans – mcstrans provides SELinux translation daemon, which translates various levels into easy formats which can be understood easily.
- setools-console – similar to setools.
- Selinux-policy – it provides a reference for configuring SELinux policy
- Selinux-policy-targeted – similar to SELinux-policy
- Libselinux-utils – SELinux libselinux utilities which help to manage SELinux
- Setroubleshoot-server – tools for troubleshooting SELinux
To verify which packages are already installed on your system, you can use the rpm –qa command and pipe the result to grep for SELinux as:
libselinux-utils-2.9-4.el8_3.x86_64
rpm-plugin-selinux-4.14.3-4.el8.x86_64
selinux-policy-targeted-3.14.3-54.el8_3.2.noarch
python3-libselinux-2.9-4.el8_3.x86_64
selinux-policy-3.14.3-54.el8_3.2.noarch
libselinux-2.9-4.el8_3.x86_64
This should give you an output of all the packages installed for SELinux support
If not all the SELinux packages are installed on your system, use yum to install them as shown in the command below:
SELinux Modes and States
Let us now start playing with SELinux, specifically, SELinux modes.
SELinux Modes
When enabled, SELinux can be three possible modes:
- Enforcing
- Permissive
- Disabled
Enforcing Mode
If SELinux mode to enforce, it will ensure that no unauthorized access to the system by any user or processes is denied. Enforcing mode also keeps logs of any attempts of unauthorized access.
Permissive Mode
Permissive mode acts like a partially enabled SELinux state. In this mode, no access is denied as SELinux does not enforce its policies in this mode. However, the permissive mode does keep a log of any policy violation attempts. This mode is very efficient for testing before enabling it fully as users and components can still interact with the system but still collecting logs. This allows you to fine-tune your system in ways you see fit.
Disabled Mode
The disabled mode can also be seen as a disabled state in which SELinux is disabled and does not offer any Security.
SELinux States
Once SELinux is installed on a system. It can have binary states: enabled and disabled. To view the state of SELinux, use the command:
Disabled
The above output indicates that SELinux is currently disabled.
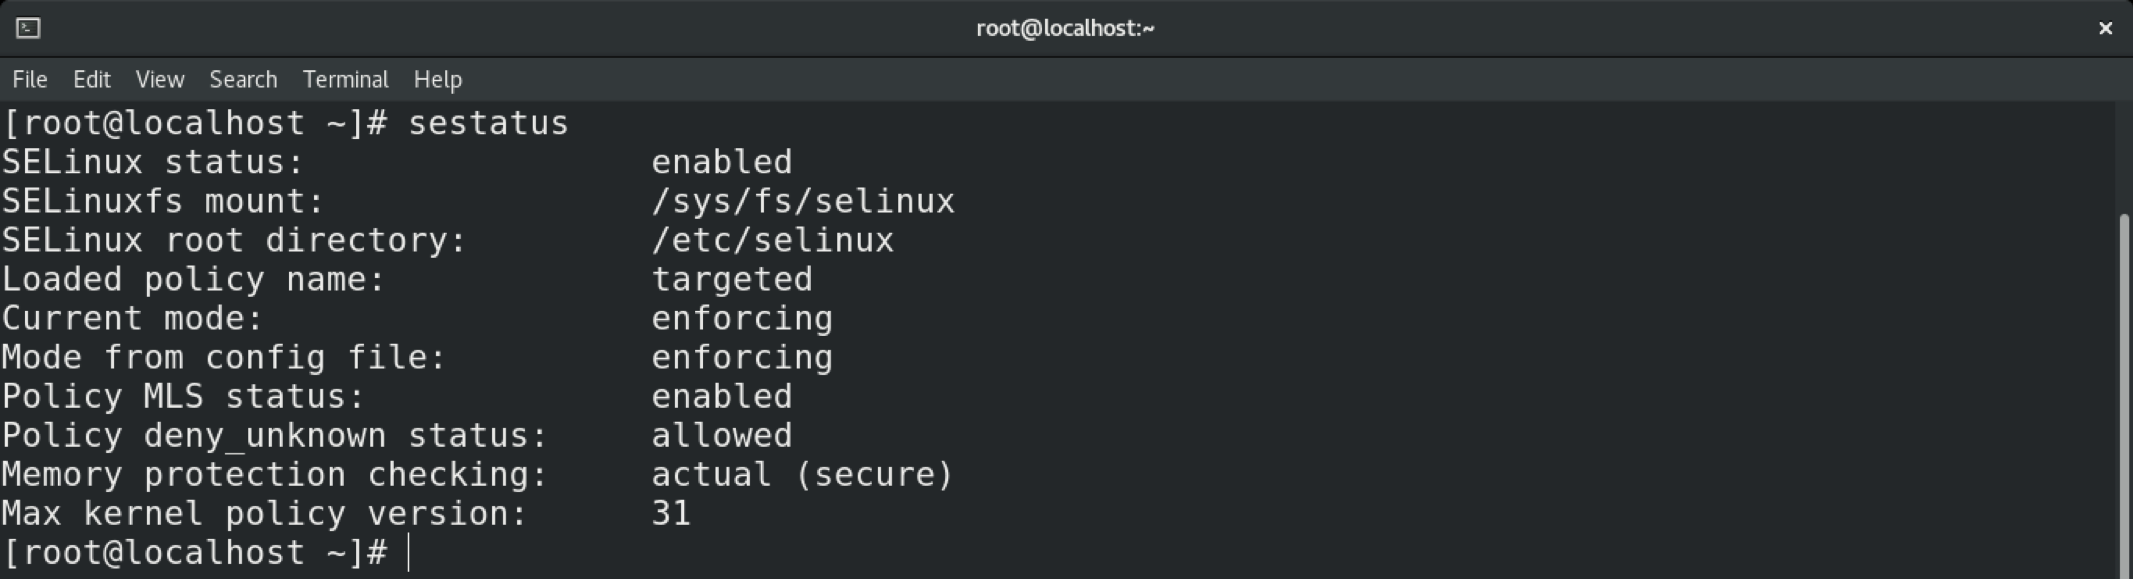
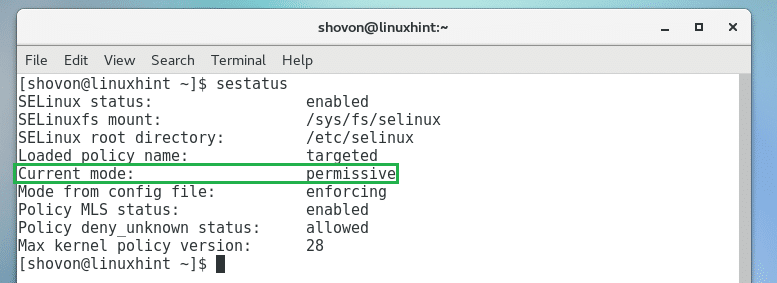
You can also use the sestatus command as shown below:
SELinux status: disabled
Enable and Disable SELinux
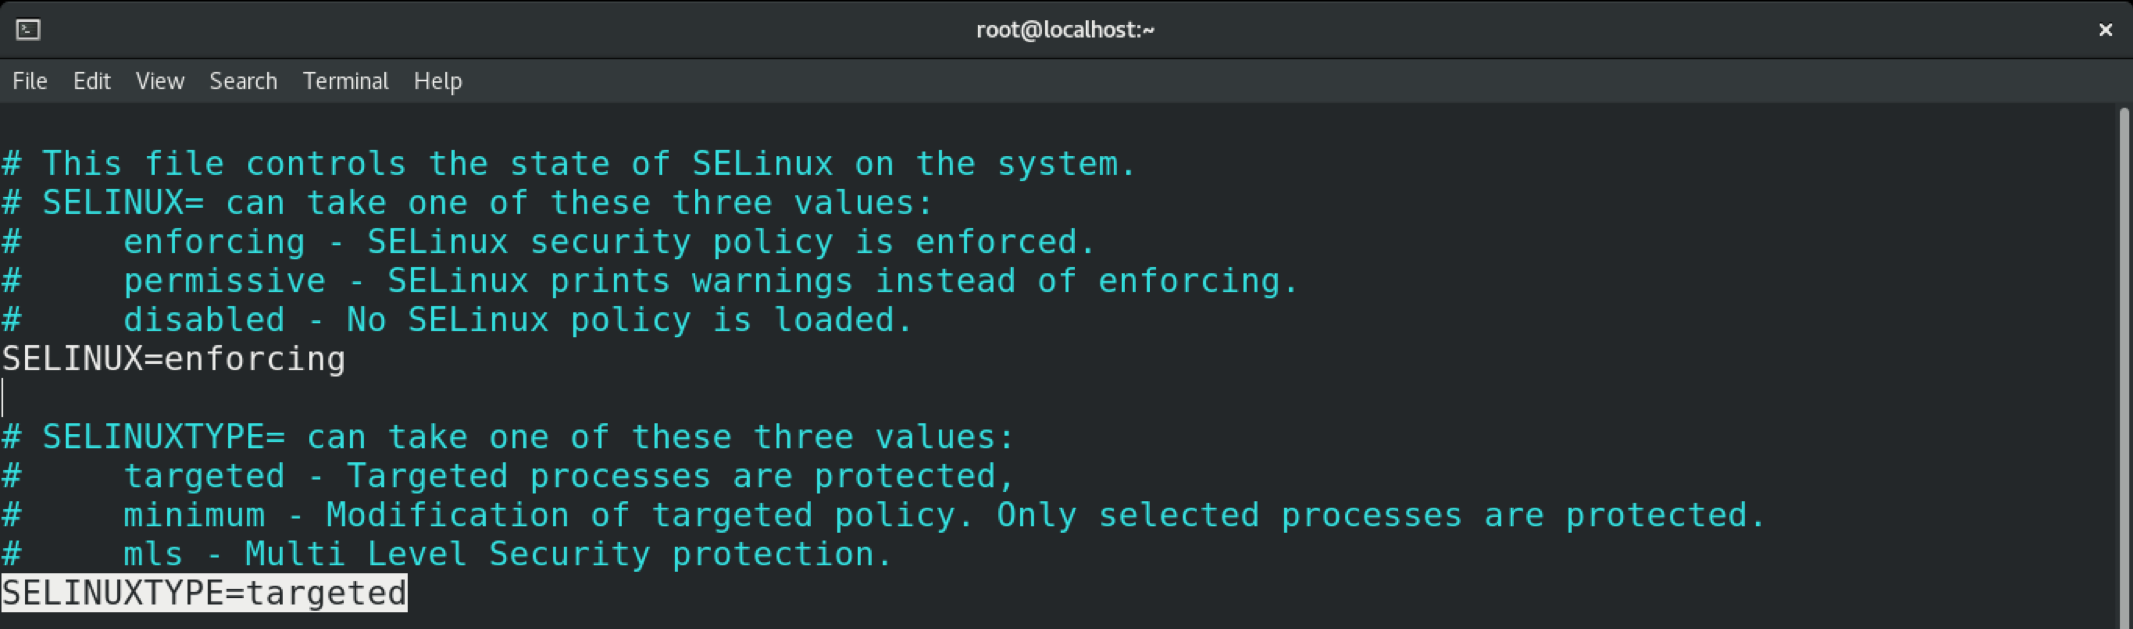
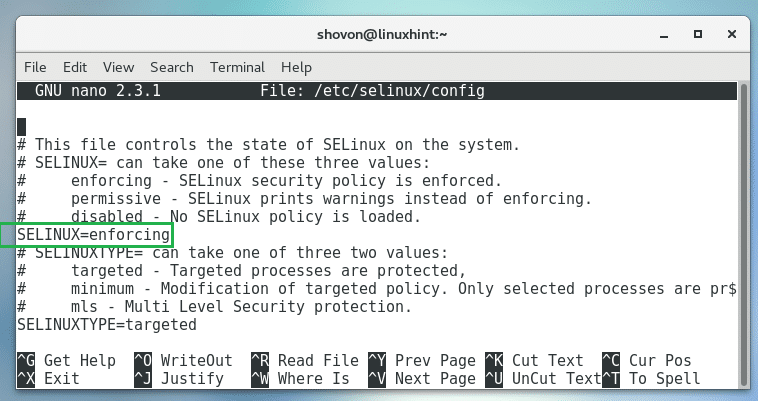
States and configuration of SELinux are handled by the Configuration file located in /etc/selinux/config. You can use the cat command to view its contents.
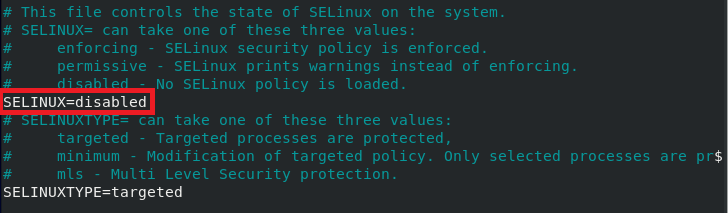
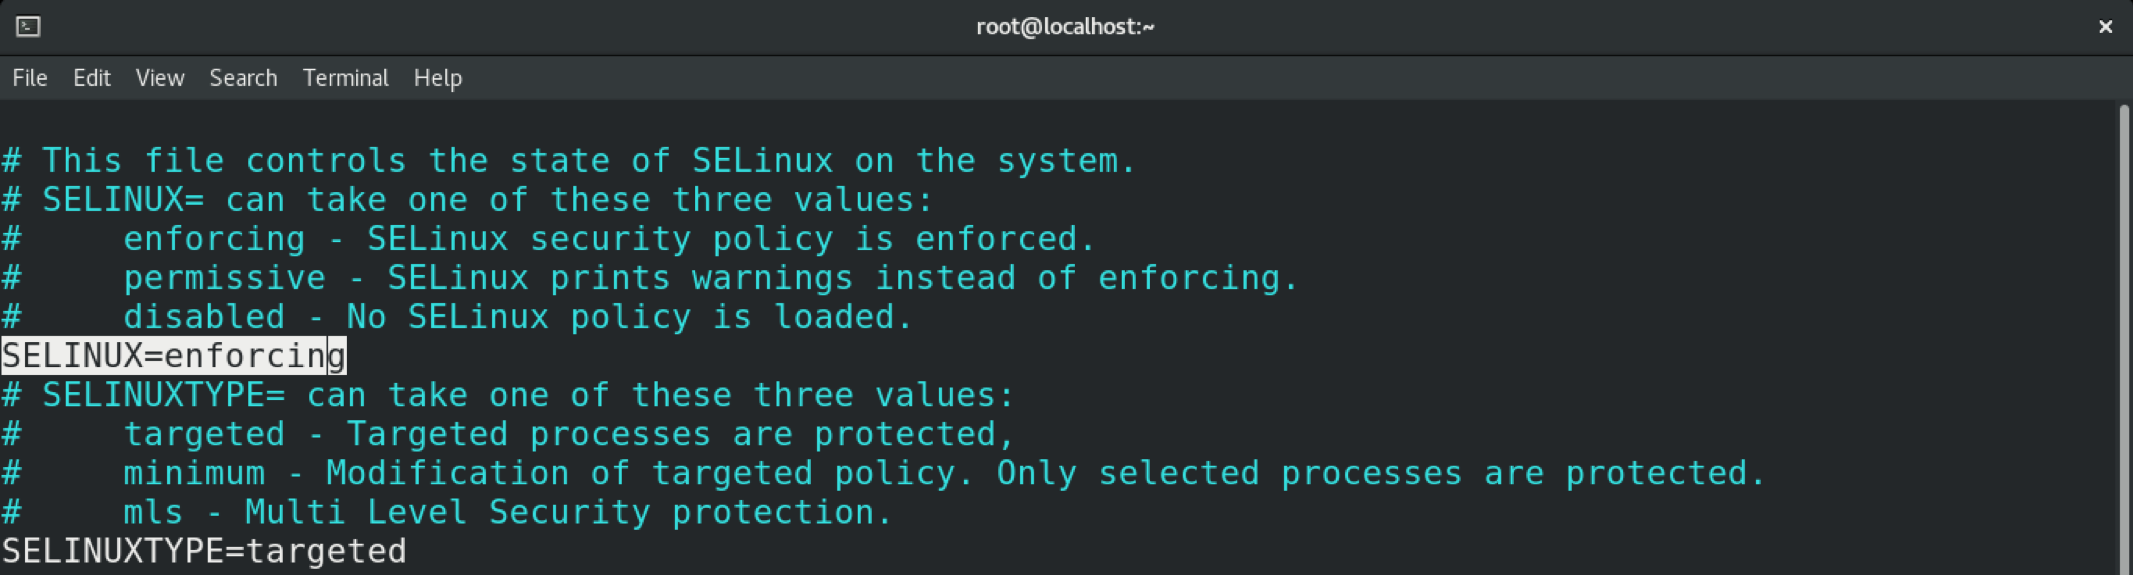
#This file controls the state of SELinux on the system.
#SELINUX= can take one of these three values:
#enforcing - SELinux security policy is enforced.
#permissive - SELinux prints warnings instead of enforcing.
#disabled - No SELinux policy is loaded.
SELINUX=enforcing
#SELINUXTYPE= can take one of these three values:
# targeted - Targeted processes are protected,
# minimum - Modification of targeted policy. Only selected processes are protected.
# mls - Multi Level Security protection.
SELINUXTYPE=targeted
From the above output, we have two main directives enabled. The SELINUX directive specified the mode in which SELinux is configured. The SELINUXTYPE directive specifies the SELinux policy set. By default, SELinux uses a targeted policy that allows you to customize access control permissions. The other policy is Multilevel security or MLS.
You may find, minimum policy in some versions.
[ls -l
total 4
-rw-r--r-- 1 root root 548 Feb 16 22:40 config
drwxr-xr-x 1 root root 4096 Feb 16 22:43 mls
-rw-r--r-- 1 root root 2425 Jul 21 2020 semanage.conf
drwxr-xr-x 1 root root 4096 Feb 16 22:40 targeted
Let us now see how to enable SELinux on the system. We recommend first set the SELINUX mode to permissive and not enforced.
Now edit the SELINUX directive as:
Once you save the file, issue a system reboot.
NOTE: We highly recommend setting the SELINUX directive to permissive before enforcing SELinux.
Once you reboot the system, check for any logs reported by SELinux in /var/log/messages.
Next, ensure you have no errors and enforce SELinux by setting the directive to enforce in /etc/selinux/config
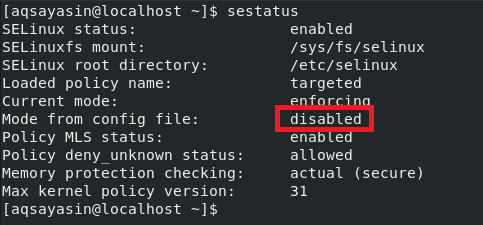
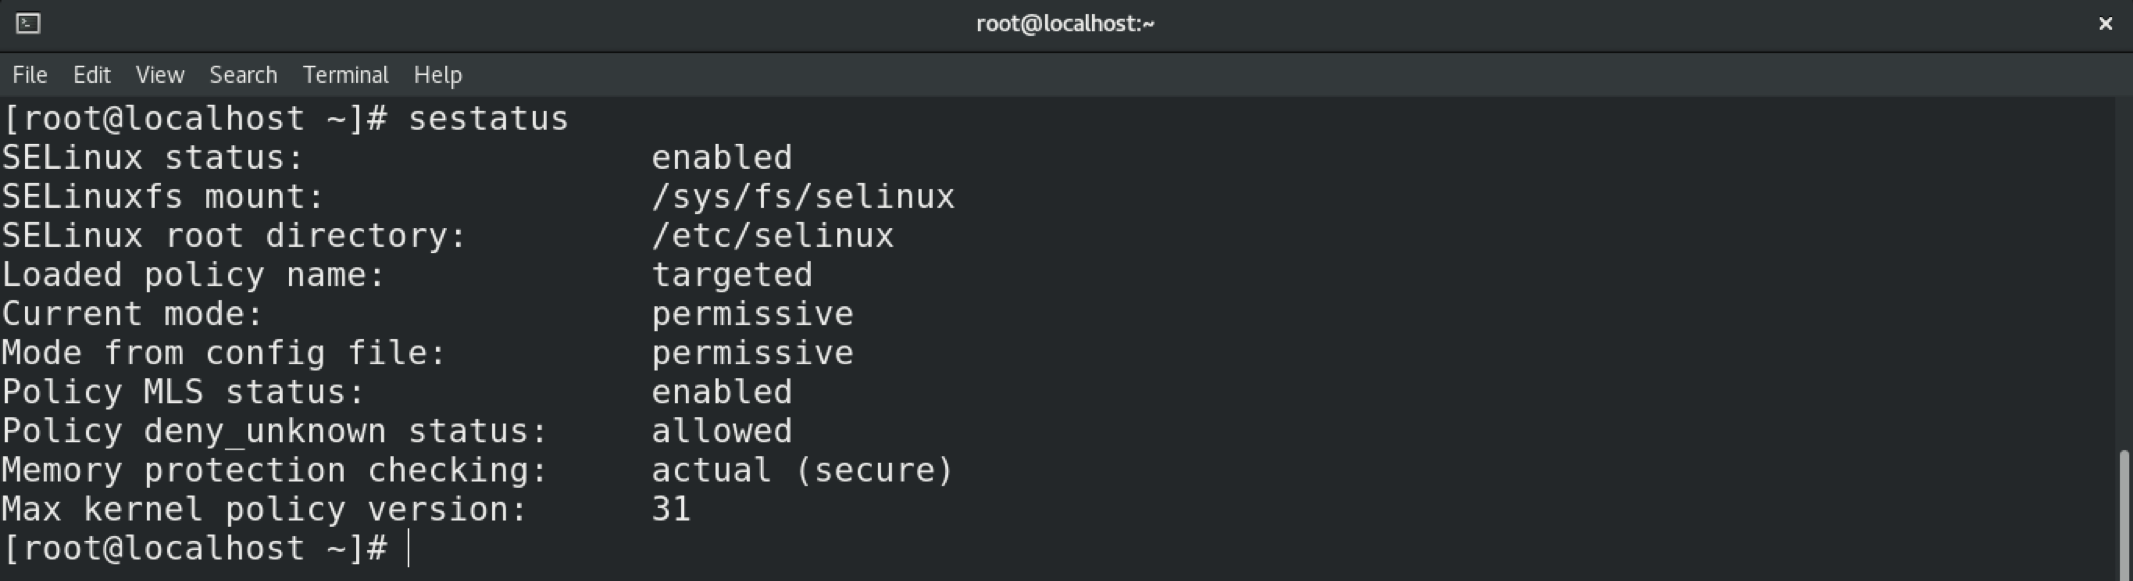
Finally, you can view the SELinux status using the sestatus command:
SELinuxfs mount: /sys/fs/selinux
SELinux root directory: /etc/selinux
Loaded policy name: targeted
Current mode: enforcing
Mode from config file: error (Success)
Policy MLS status: enabled
Policy deny_unknown status: allowed
Memory protection checking: actual(secure)
Max kernel policy version: 31
You can also use the setenforce command to switch between various SELinux modes. For example, to set the mode to permissive, use the command:
This mode is temporary and will be restored to one in the config file after a reboot.
SELinuxfs mount: /sys/fs/selinux
SELinux root directory: /etc/selinux
Loaded policy name: targeted
Current mode: permissive
Mode from config file: enforcing
Policy MLS status: enabled
Policy deny_unknown status: allowed
Memory protection checking: actual(secure)
Max kernel policy version: 31
SELinux Policy and Context
To avoid confusion for SELinux beginners, we will not dive deep into how SELinux policies are implemented but simply touch on it to give you an idea.
SELinux works by implementing security policies. An SELinux policy refers to a rule that is used to define access rights for every object in the system. Objects refer to users, processes, files, and roles.
Each context is defined in the form of the user:role:type:level.
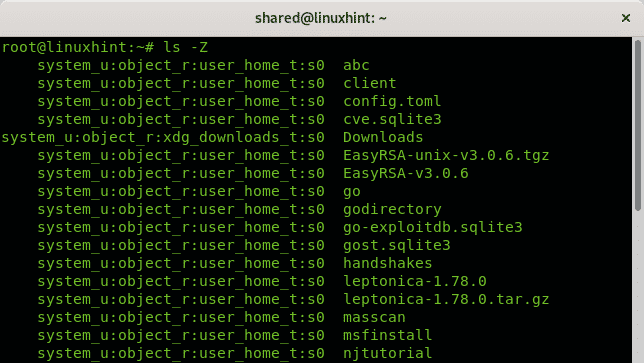
For example, create a directory in your home directory and view its SELinux security context as shown in the commands below:
ls –Z ~/ | grep linuxhint
This will display output as shown below:
You may also find other directories with the security contexts as:
You may realize the above output follows the syntax of the user:role:type:level.
Conclusion
That was a beginner’s tutorial to SELinux using CentOS 8. Although the tutorial is designed for beginners, it is more than enough to get your feet running in SELinux and remove the intimidating nature of SELinux.
Thank you for reading.
]]>This additional information contains the following four entities:
- SELinux User: Defines the identity of the user who accesses, owns, modifies, or deletes a process or file in Linux-based operating systems. If a user has access to any particular file or process in Linux, then the user’s identity is explicitly mentioned in the SELinux security policy. This means that a Linux user is always referred to by his or her identity.
- Role: Based on this entity, a user is allowed or denied access to a certain object in SELinux. The concept of a role is derived from one of the very famous access control models, i.e., Role-Based Access Control (RBAC). This model is particularly useful when a lot of users share the same access rights. Instead of associating each individual user with specific access rights, the access rights are associated with a particular role. The access rights associated with the particular role of a user are automatically assigned to that user.
- Type: This entity is used to define types of files and domains of processes in SELinux. By using this entity, access is granted if and only if a rule in the access control policy of SELinux is present for that particular type, and also the rule is there for granting access and not vice versa.
- Level: This entity represents Multi-Level Security (MLS) and Multi-Category Security (MCS). The security levels are defined by terms such as high, low, etc.
In short, an SELinux context is a combination of these four attributes. With the help of these four attributes, SELinux grants or denies file or process access to a user.
This article shows you methods for listing all the SELinux contexts in CentOS 8.
Methods for Listing SELinux Contexts in CentOS 8
To list all the SELinux contexts in CentOS 8, you can pick any of the four methods shared below:
Method # 1: Using the “semanage” Command
To list the SELinux contexts for all the files and processes in your CentOS 8 system, run the following command in your CentOS 8 terminal:
This command cannot run without root user privileges. It is mandatory to use the “sudo” keyword with this command; otherwise, it will render an error message. So, it is better to use this command in the same way stated above to save you precious time.
![]()
Once this command has completed its execution, all the SELinux contexts will be displayed in your terminal, as shown in the image below. You can scroll up, down, left, or right to have a complete view of all the SELinux contexts in CentOS 8.
Method # 2: Using the “ls” Command
To obtain all the SELinux file contexts in CentOS 8, you can also the following command in your CentOS 8 terminal:
The SELinux file contexts are stored in the “root” directory. To access this directory, you must have root user privileges. In other words, you must run this command along with the “sudo” keyword, just as we did.
![]()
After executing this command, you can view all the SELinux file contexts in your CentOS 8 terminal, as shown in the image below:

Method # 3: Using the “ps” Command
We listed all the SELinux file contexts in the method shown above. At times, you might only need to list all the SELinux process contexts in CentOS 8. You can obtain these contexts only by running the following command in the terminal:
You must have root user privileges to execute the command stated above. In other words, you must run this command along with the “sudo” keyword, just as we did.
![]()
After executing this command, you can view all the SELinux process contexts in the terminal, as shown below:
Method # 4: Using the “id” Command
At other times, you might only need to obtain SELinux current user contexts in CentOS 8. You can list all the SELinux current user contexts by running the following command in your CentOS 8 terminal:
![]()
After executing this command, you can view all the SELinux current user contexts in the terminal, as shown in the image below. This is all the information associated with your current user in the CentOS 8 system.

Conclusion
In this article, first, we shared with you a method for listing all the SELinux contexts at once. Then, we shared with you methods for listing all the SELinux files, processes, and user contexts separately. This puts you in a very good position to play around with SELinux contexts. If you want to see all the contexts of the SELinux processes and files at once, then make use of Method 1. However, if this is not the case, then you can choose Method 2, Method 3, or Method 4 according to your requirements.
]]>Note: All the commands stated below have been executed in CentOS 8. However, if you want to use any other distribution of Linux, then you can also do it very conveniently.
Basic SELinux Commands
There are some basic commands that are very frequently used with SELinux. In the following sections, we will first state each command, then we will provide examples to show you how to use each command.
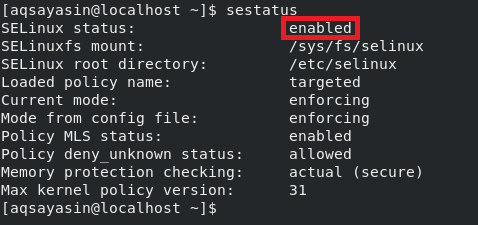
Checking SELinux Status
After launching the terminal in CentOS 8, suppose we would like to examine the status of SELinux, i.e., we would like to determine whether SELinux is enabled in CentOS 8. We can view the status of SELinux in CentOS 8 by executing the following command in the terminal:
![]()
Running this command will tell us whether SELinux is enabled in CentOS 8. SELinux is enabled in our system, and you can see this status highlighted in the image below:
Changing SELinux Status
SELinux is always enabled by default in Linux-based systems. However, if you feel like turning SELinux off or disabling it, then you can do this by tweaking the SELinux configuration file in the following manner:
![]()
When this command is executed, the SELinux configuration file will open with the nano editor, as shown in the image below:
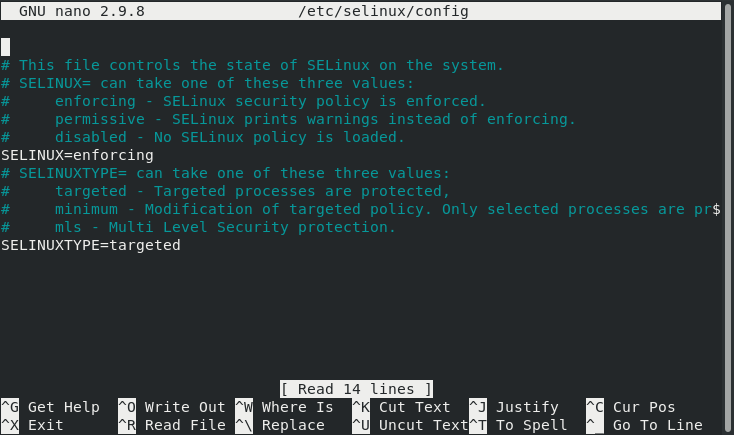
Now, you need to find out the SELinux variable in this file and change its value from “Enforcing” to “Disabled,” After that, press Ctrl+ X to save your SELinux configuration file and get back to the terminal.
When you check the status of SELinux again by running the “sestatus” command above, the status in the configuration file will change to “Disabled,” whereas the current status will still be “Enabled,” as highlighted in the following image:
Therefore, to put your changes into full effect, you will need to reboot your CentOS 8 system by running the following command:
![]()
After rebooting your system, when you check the status of SELinux again, SELinux will be disabled.
Checking SELinux Mode of Operation
SELinux is enabled by default and works in the “Enforcing” mode, which is its default mode. You can determine this by running the “sestatus” command or by opening the SELinux configuration file. This can also be verified by running the command below:
![]()
After executing the above command, you will see that SELinux is operating in the “Enforcing” mode:

Changing SELinux Mode of Operation
You can always change the default mode of operation of SELinux from “Enforcing” to “Permissive.” To do this, you need to use the “setenforce” command in the following manner:
![]()
When used with the “setenforce” command, the “0” flag changes the mode of SELinux from “Enforcing” to “Permissive.” You can verify whether the default mode has been changed by running the “getenforce” command again, and you will see that the SELinux mode has been set to “Permissive,” as highlighted in the image below:

Viewing SELinux Policy Modules
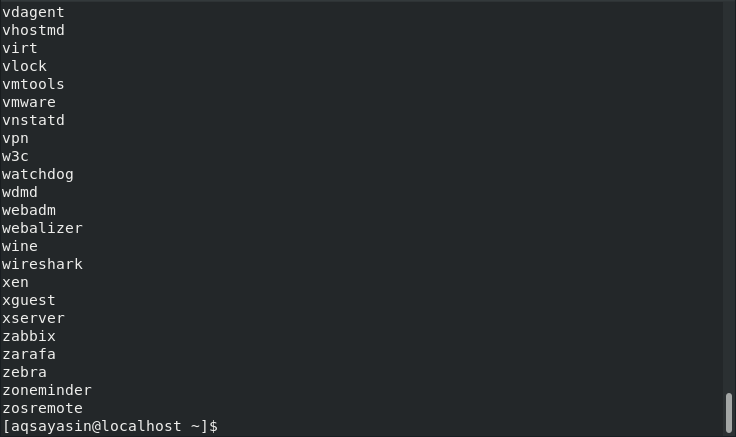
You can also view SELinux policy modules that are currently running on your CentOS 8 system. The policy modules of SELinux can be viewed by running the following command in the terminal:
![]()
Executing this command will display all currently running SELinux policy modules in your terminal, as shown in the image below. To access the entire list, you can scroll up or down.
Generating SELinux Audit Log Report
At any point in time, you can generate a report from your SELinux audit logs. This report will contain all information regarding any potential event that has been blocked by SELinux and also how you can allow the blocked event(s) if needed. This report can be generated by running the following command in the terminal:
![]()
In our case, since there was no suspicious activity taking place, that is why our report was very precise and did not generate any alerts, as shown in the image below:

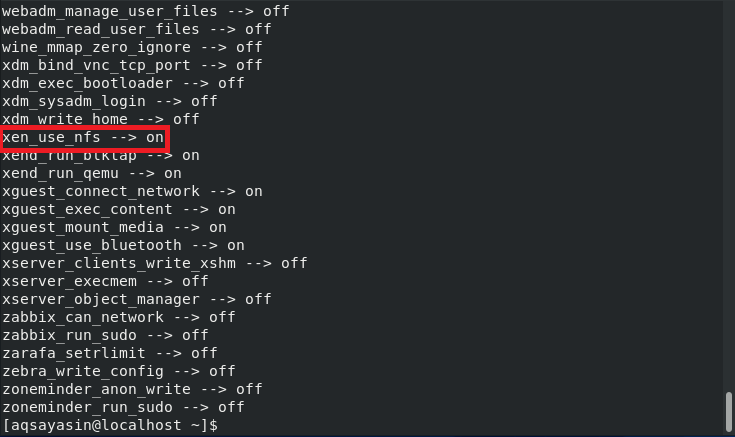
Viewing and Changing SELinux Boolean
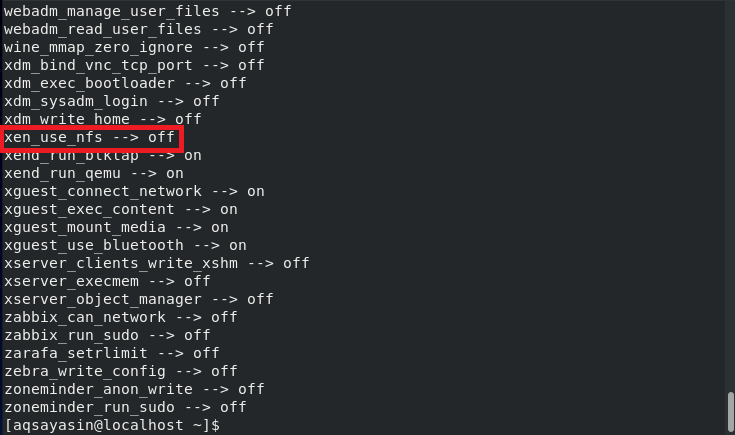
There are certain variables of SELinux whose value can either be “on” or “off.” Such variables are known as SELinux Boolean. To view all the SELinux Boolean variables, use the “getsebool” command in the following manner:
![]()
Executing this command will display a long list of all the variables of SELinux whose value can either be “on” or “off,” as shown in the image below:
The best thing about SELinux Boolean is that even after changing the values of these variables, you do not need to restart your SELinux mechanism; rather, these changes take effect immediately and automatically.
Now, we would like to show you the method of changing the value of any SELinux Boolean variable. We have already selected a variable, as highlighted in the image shown above, whose value is currently “off.” We can toggle this value to “on” by running the following command in our terminal:
Here, you may replace xen_use_nfs with any SELinux Boolean of your choice whose value you wish to change.
![]()
After running the above command, when you run the “getsebool” command again to view all the SELinux Boolean variables, you will be able to see that the value of xen_use_nfs has been set to “on,” as highlighted in the image below:
Conclusion
In this article, we discussed all the basic SELinux commands in CentOS 8. These commands are used quite often while interacting with this security mechanism of SELinux. Therefore, these commands are considered extremely helpful.
]]>In today’s article, we would like to share with you the methods of setting SELinux to the “Permissive” mode after walking you through its important details.
What is SELinux Permissive Mode?
The “Permissive” mode is also one of the three modes in which SELinux operates, i.e., “Enforcing”, “Permissive”, and “Disabled”. These are the three particular categories of SELinux modes, whereas generically, we can say that at any particular instance, SELinux will either be “Enabled” or “Disabled”. The “Enforcing” and “Permissive” modes both fall under the “Enabled” category. In other words, it means that whenever SELinux is enabled, it will either be operating in the “Enforcing” mode or the “Permissive” mode.
This is why most of the users get confused between the “Enforcing” and “Permissive” modes because, after all, they both fall under the “Enabled” category. We would like to draw a clear distinction between the two by first defining their purposes, and then mapping it on to an example. The “Enforcing” mode works by implementing all the rules that are stated in the SELinux security policy. It blocks the access of all the users that are disallowed to access a particular object in the security policy. Moreover, this activity is also logged in the SELinux log file.
On the other hand, the “Permissive” mode does not block the unwanted access, rather, it simply records all such activities in the log file. Therefore, this mode is mostly used for tracking bugs, auditing, and adding new security policy rules. Now, consider an example of a user “A” who wishes to access a directory named “ABC”. It is mentioned in the SELinux security policy that the user “A” will always be denied access to the directory “ABC”.
Now, if your SELinux is enabled and is operating in the “Enforcing” mode, then whenever the user “A” will try to access the directory “ABC” the access will be denied, and this event will be recorded in the log file. On the other hand, if your SELinux is operating in the “Permissive” mode, then the user “A” will be allowed to access the directory “ABC”, but still, this event will be recorded in the log file so that an administrator may know where the security breach occurred.
Methods of Setting SELinux to Permissive Mode on CentOS 8
Now when we have fully understood the purpose of the “Permissive” mode of SELinux, we can easily talk about the methods of setting SELinux to “Permissive” mode on CentOS 8. However, before heading on to these methods, it is always good to check the default status of SELinux by running the following command in your terminal:
![]()
The default mode of SELinux is highlighted in the image shown below:

Method of Temporarily Setting SELinux to Permissive Mode on CentOS 8
By temporarily setting SELinux to the “Permissive” mode, we mean that this mode will be enabled only for the current session and, as soon as you restart your system, SELinux will resume its default mode of operation, i.e., the “Enforcing” mode. For temporarily setting SELinux to the “Permissive” mode, you need to run the following command on your CentOS 8 terminal:
![]()
By setting the value of the “setenforce” flag to “0”, we are essentially changing its value to “Permissive” from “Enforcing”. Running this command will not display any output, as you can view from the image appended below.

Now to verify if SELinux has been set to the “Permissive” mode in CentOS 8 or not, we will run the following command in the terminal:
![]()
Running this command will return the current mode of SELinux and that will be “Permissive”, as highlighted in the image shown below. However, as soon as you will restart your system, SELinux will get back to the “Enforcing” mode.

Method of Permanently Setting SELinux to Permissive Mode on CentOS 8
We have already stated in Method # 1 that following the above method will only temporarily set SELinux to the “Permissive” mode. However, if you want these changes to be there even after you restart your system, then you will need to access the SELinux configuration file in the following manner:
![]()
The configuration file of SELinux is shown in the image below:
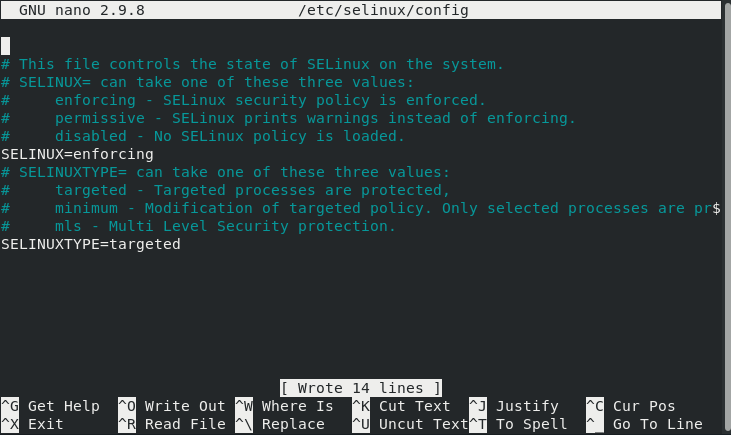
Now, you need to set the value of the “SELinux” variable to “permissive”, as highlighted in the following image after which you can save and close your file.
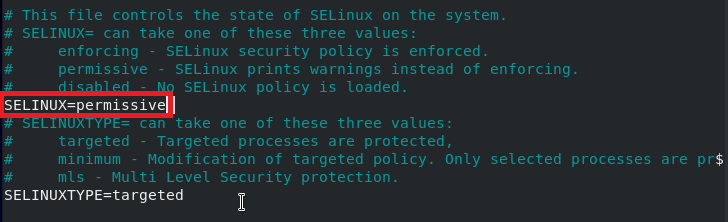
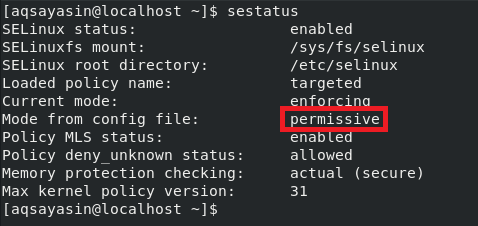
Now, you need to check the status of SELinux once again to find out if its mode has been changed to “Permissive” or not. You can do this by running the following command in your terminal:
![]()
You can see from the highlighted portion of the image shown below that, right now, only the mode from the configuration file is changed to “Permissive”, whereas the current mode is still “Enforcing”.
Now for making our changes to take effect, we will restart our CentOS 8 system by running the following command in the terminal:
![]()
After restarting your system, when you will check the status of SELinux again with the “sestatus” command, you will notice that the current mode has also been set to “Permissive”.
Conclusion:
In this article, we learned the difference between the “Enforcing” and “Permissive” modes of SELinux. Then we shared with you the two methods of setting SELinux to the “Permissive” mode in CentOS 8. The first method is for temporarily changing the mode, whereas the second method is for permanently changing the mode to “Permissive”. You can use any of the two methods as per your requirements.
]]>There are several different ways SELinux can operate. This is defined by the SELinux policy. In this guide, you will learn more about SELinux policies and how to set a policy in SELinux.
SELinux Policy Overview
Let us have a quick rundown of SELinux and its policies. SELinux is an acronym for “Security-Enhanced Linux.” It comprises a series of security patches to the Linux kernel. SELinux was originally developed by the National Security Agency (NSA) and released to the open-source development community in 2000 under the GPL license. It was merged with the mainline Linux kernel in 2003.
SELinux provides MAC (Mandatory Access Control) rather than the default DAC (Discretionary Access Control). This allows for the implementation of some security policies that would not be possible to implement otherwise.
SELinux policies are sets of rules that guide the SELinux security engine. A policy defines types for file objects and domains for processes. Roles are used for limiting access to domains. User identities determine what roles can be attained.
There are two SELinux policies available:
- Targeted: The default policy. Implements access control to targeted processes. The processes run in a confined domain where the process has limited access to files. If a confined process is compromised, the damage is mitigated. In the case of services, only specific services are placed into these domains.
- MLS: Stands for Multi-Level Security. Check out the Red Hat documentation on the SELinux MLS policy.
Processes that are not targeted will run in an unconfined domain. Processes running in unconfined domains enjoy almost complete access. If such a process is compromised, SELinux offers no mitigation. The attacker may gain access to the whole system and resources. However, DAC rules still apply for the unconfined domains.
The following is a short list of examples of unconfined domains:
- initrc_t domain: init programs
- kernel_t domain: kernel processes
- unconfined_t domain: users logged into the Linux system
Changing SELinux Policy
The following examples are performed in CentOS 8. All the commands in this article are run as the root user. For other distros, please check out the appropriate tutorial on how to enable SELinux.
To change a policy in SELinux, start by checking the SELinux status. The default status should be SELinux enabled in the “Enforcing” mode with the “targeted” policy.
To change the SELinux policy, open the SELinux configuration file in your favorite text editor.
Here, our target is the “SELINUXTYPE” variable that defines the SELinux policy. As you can see, the default value is “targeted.”
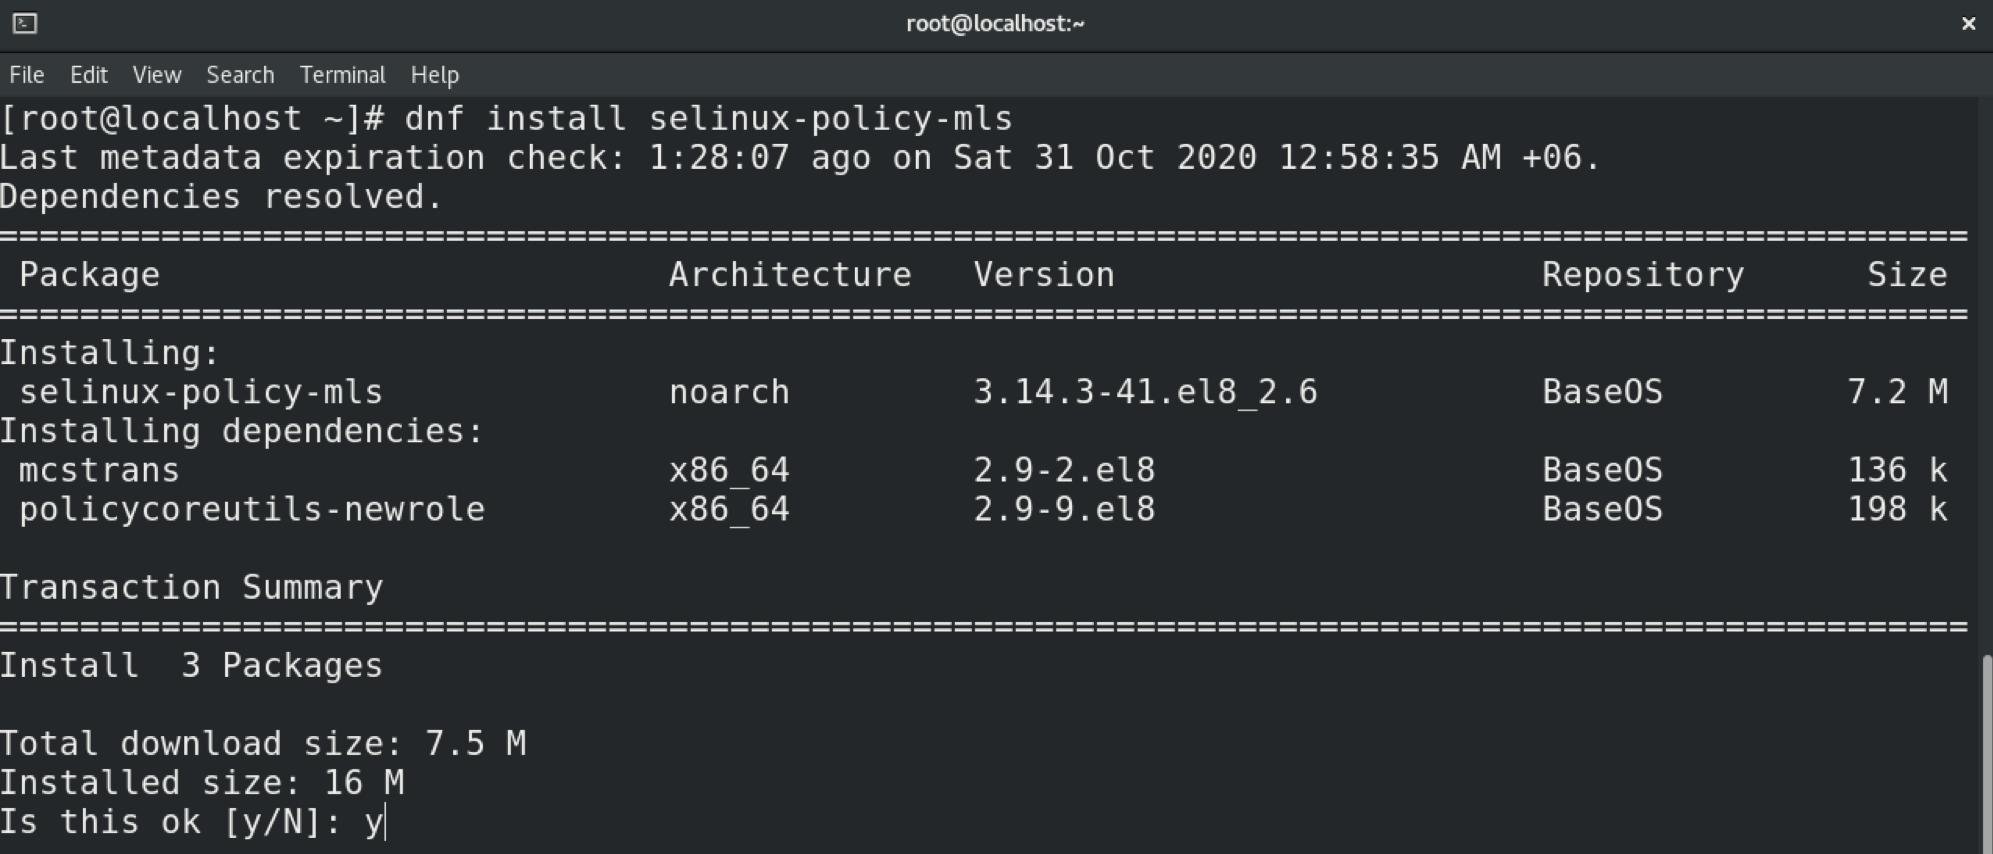
All steps demonstrated in this example are performed in CentOS 8. In the case of CentOS, the MLS policy does not come installed by default. This is also likely to be the case in other distros. Learn how to configure SELinux on Ubuntu here. Be sure to install the program first. In the case of Ubuntu, CentOS, openSUSE, Fedora, Debian, and others, the package name is “selinux-policy-mls.”
In this case, we will switch the policy to MLS. Change the value of the variable accordingly.
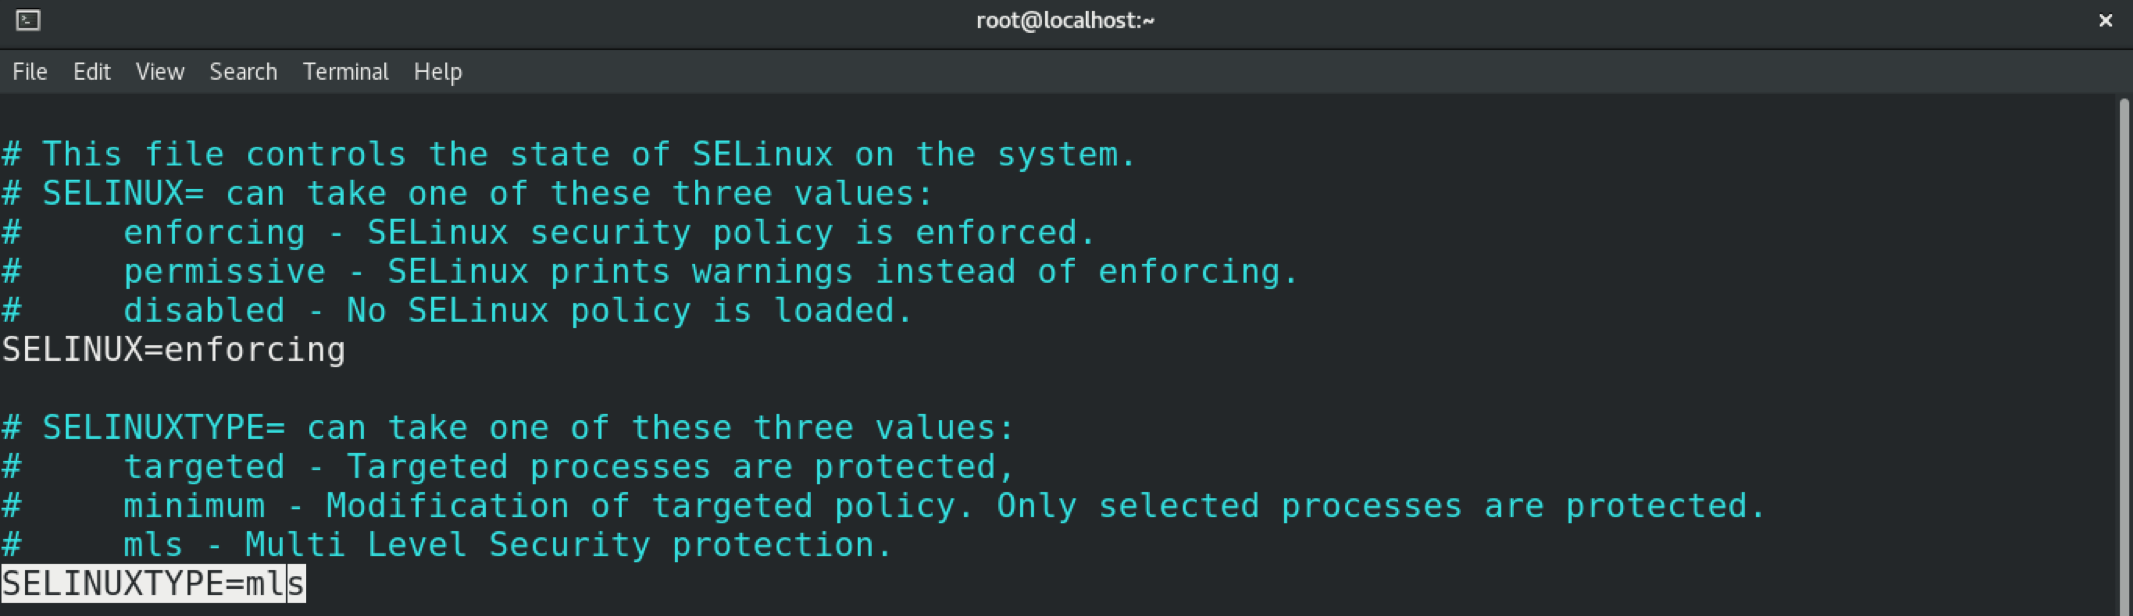
Save the file and exit the editor. To put these changes into effect, you must reboot the system.
Verify the change by issuing the following.
Changing SELinux Modes
SELinux can operate in three different modes. These modes determine how the policy is enforced.
- Enforced: any action against the policy is blocked and reported in the audit log.
- Permissive: any action against the policy is only reported in the audit log.
- Disabled: SELinux is disabled.
To temporarily change the mode in SELinux, use the setenforce command. If the system is rebooted, the system will revert to the default setting.


To permanently change the mode in SELinux, you must tweak the SELinux configuration file.
Save and close the editor. Reboot the system to put the changes into effect.
You can verify the change using the sestatus command.
Conclusion
SELinux is a powerful mechanism for enforcing security. Hopefully, this guide helped you learn how to configure and manage the behavior of SELinux.
Happy computing!
Before starting you’ll need to learn the following concepts:
Subjects: processes or users.
Objects: files or filesystems.
Type Enforcement: on SELinux all subjects and objects have a type identifier ending with _t. “Type enforcement is the notion that, in a mandatory access control system, access is governed through clearance based on a subject-access-object set of rules.
In SELinux, type enforcement is implemented based on the labels of the subjects and objects. SELinux by itself does not have rules that say /bin/bash can execute /bin/ls. Instead, it has rules similar to “Processes with the label user_t can execute regular files labeled bin_t.” (source https://wiki.gentoo.org/wiki/SELinux/Type_enforcement)
Discretionary Access Control (DAC): DAC is the ownership and permission system we use in Linux to manage access to objects like files or directories. The Discretionary Access Control has nothing to do with SELinux and is a different security layer. For additional information on DAC visit Linux Permissions Explained.
Mandatory Access Control (MAC): is a type of access control which restricts subjects access interaction with objects. Contrary to DAC with MAC users can’t change policies.
Subjects and objects have a security context (security attributes) monitored by SELinux and administered according to security policies made by rules to be enforced.
Role Based Access Control (RBAC): is a type of access control based on roles, it can be combined with both MAC and DAC. RBAC policies make management of many users within an organization simple in contrast to DAC which can derive in individual permission assignments, it makes auditing, configuration and policy updates easier.
Enforcing mode: SELinux restricts subjects access to objects based on policies.
Permissive mode: SELinux only logs illegitimate activity.
SELinux features include (Wikipedia list):
- Clean separation of policy from enforcement
- Well-defined policy interfaces
- Support for applications querying the policy and enforcing access control (for example, crond running jobs in the correct context)
- Independence of specific policies and policy languages
- Independence of specific security-label formats and contents
- Individual labels and controls for kernel objects and services
- Support for policy changes
- Separate measures for protecting system integrity (domain-type) and data confidentiality (multilevel security)
- Flexible policy
- Controls over process initialization and inheritance, and program execution
- Controls over file systems, directories, files, and open file descriptors
- Controls over sockets, messages, and network interfaces
- Controls over the use of “capabilities”
- Cached information on access-decisions via the Access Vector Cache (AVC)
- Default-deny policy (anything not explicitly specified in the policy is disallowed).
Source: https://en.wikipedia.org/wiki/Security-Enhanced_Linux#Features
Note: users are different on SELinux and passwd.
Setting up SELinux on Debian 10 Buster
In my case SELinux was disabled on Debian 10 Buster. Keeping SELinux enabled is one of the basic steps to keep a Linux device safe. To know the status of SELinux in your device run the command:

I found SELinux was disabled, to enable it you need to install some packages before, after an apt update, run the command:

If requested press Y to continue the installation process. Run apt update after finishing the installation.
To enable SELinux run the following command:
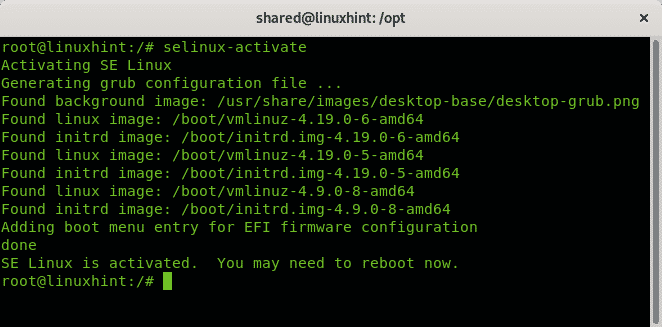
As you can see SELinux was properly activated. To apply all changes you must reboot your system as instructed.
The command getenforce can be used to learn the SELinux status, if its under permissive or enforcing mode:

The permissive mode could be replaced by setting the parameter 1 (permissive is 0). You can also check the mode on the configuration file using the command less:
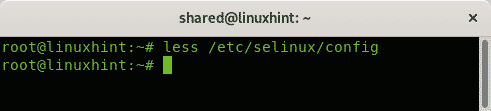
Output:

As you can see the configuration files show the permissive mode. Press Q to quit.
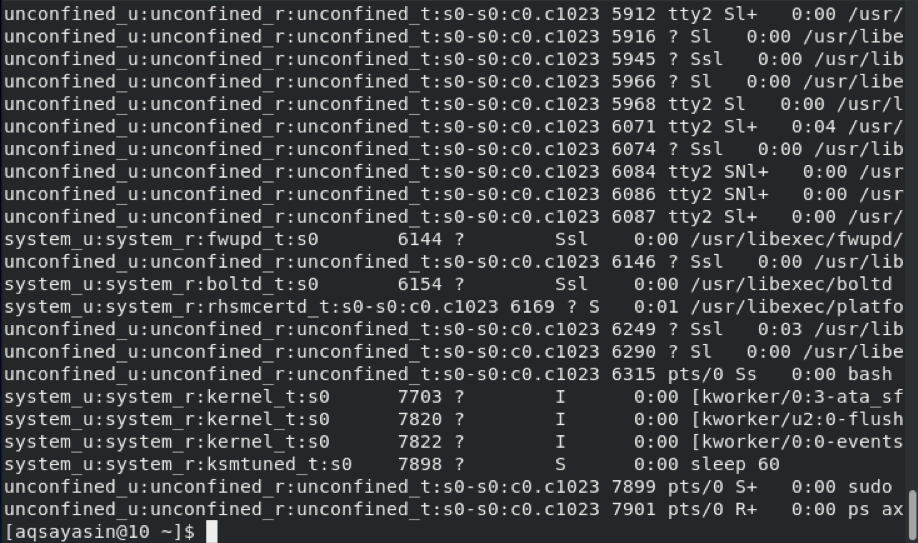
To see a file or process security context you can use the flag -Z:
The label format is user:role:type:level.
semanage – SELinux Policy Management tool
semanage is the SELinux Policy Management tool. It allows to manage booleans (which allow to modify process on the run), user roles and levels, network interfaces, policy modules and more. Semanage allows to configure SELinux policies without the need to compile sources. Semanage allows the link between the OS and SELinux users and certain objects security contexts.
For additional information on semanage visit the man page at: https://linux.die.net/man/8/semanage
Conclusion and notes
SELinux is an additional way to administer access from processes to system resources such as files, partitions, directories, etc. It allows to manage massive privileges according to role, level or type. Having it enabled is a must as security measure and when using it is important to remember its security layer and to reboot the system after enabling or disabling it (disabling isn’t recommended at all except for specific tests). Sometimes a file access is blocked despite the system or OS permissions are granted because SELinux is forbidding it.
I hope you found this article on SELinux useful as introduction this security solution, keep following LinuxHint for more tips and updates on Linux and networking.
Related articles:
]]>How to Disable SELinux on CentOS 7
The full name of SELinux is Security-Enhanced Linux. It is a security feature of Linux built into the Linux kernel. It is used to control access to users, files, network resources and applications of a Linux system. SELinux provides extended file system permissions on top of the traditional Linux filesystem permission known as Discretionary Access Control (DAC).
SELinux is a good security feature. But it is hard to understand and maintain. That is why small companies and startups often don’t bother with SELinux. CentOS 7 and Red Hat Enterprise Linux 7 (RHEL 7) comes with SELinux pre-installed.
In this article, I will show you how to disable SELinux on CentOS 7. Let’s get started.
Modes of SELinux
SELinux has 3 states or modes. They are enforcing, permissive, and disabled.
enforcing mode: In enforcing mode, SELinux security policy is enforced. In this mode, SELinux is enabled and its policy is in effect. That means the things that SELinux won’t allow, won’t be allowed.
For example, if an application is configured to run on a specific port by default, let’s say port 80, and you change the port to something else, let’s say port 81, you will also have to configure SELinux to allow the application to run on port 81. If you don’t, then in enforcing mode, SELinux won’t let the application run at all.
permissive mode: In permissive mode, SELinux is enabled. But the SELinux policy is not enforced. That is, SELinux will allow whatever an application is trying to do. So how does this help? Well, when SELinux is in permissive mode, it will log whatever not allowed by SELinux policy.
disabled mode: In disabled mode, SELinux is disabled. No SELinux policy is loaded by the operating system.
If your operating system comes with SELinux pre-installed as in the case for CentOS 7 and RHEL 7, SELinux is set to enforcing mode by default.
Checking the Current Status & Mode of SELinux
If you have SELinux installed, you may want to know whether SELinux is on and which mode it is in. It is pretty straightforward.
Run the following command to check the current status & mode of SELinux:

As you can see in the screenshot below, the orange marked section says SELinux status is enabled. The green marked section says that the Current mode is enforcing.

Temporarily Disable SELinux on CentOS 7
You may require SELinux to be enabled. But if you try to test or configure new applications in your CentOS 7 operating system while SELinux is enabled, even the right configuration may not work.
For example, if you have Apache web server installed, the default web root is /var/www/html. If you have SELinux enabled, and you try to change it to something else, Apache web server won’t start unless you reconfigure SELinux.
In situations like this, you may want to disable SELinux temporarily. But SELinux can’t be disabled without a system reboot. You may consider changing SELinux mode to permissive. That way SELinux policy won’t be enforced, which is kind of the same as disabling SELinux. When you’re done, you can set SELinux to enforcing mode again.
You can run the following command to set SELinux to permissive mode temporarily:

Now run the following command to check the current mode of SELinux:
As you can see in the marked section of the screenshot below, SELinux is set to permissive mode.
You can run the following command to switch it back to enforcing mode:

Permanently Disable SELinux on CentOS 7
You may permanently disable SELinux on CentOS 7 if you want.
Run the following command to edit /etc/selinux/config SELinux configuration file:

You should see the following window. Now change SELINUX=enforcing as marked in the screenshot below to SELINUX=disabled
The final configuration should look like this:

Now press <Ctrl> + x and then press y and then press <Enter> to save the file.
Now reboot your computer with the following command:

Once your computer starts, check the status of SELinux again with the following command:
As you can see in the marked section of the screenshot below, SELinux status is disabled.

That’s how you disable SELinux on CentOS 7. Thanks for reading this article.
]]>Introduction
SELinux is a mandatory access control (MAC) module residing in the kernel level of linux systems. It’s a joint development of Redhat and NSA released around 1998 and still being maintained by an enthusiast community. By default, Ubuntu uses AppArmor and not SeLinux, which is similar in terms of performance but rather popular in terms of simplicity. However, SeLinux is known to be quite secure due to the involvement of a government agency. SELinux is an open source application which protects the host by isolating each application and confining its activities. By default, processes are blocked from doing any activities unless the explicit permission is granted. The module natively provides two global level management rules: Permissive and Enforcing which respectively logs each violated rule, and denies access to a particular request sent from a process. This tutorial demonstrates how to use it on Ubuntu with ease.
How to Install and Enable
SeLinux is a very tricky application to install, because if it’s not properly configured prior to the first reboot, it will make the entire operating system unbootable, meaning anything beyond the initial booting screen will be virtually unreachable by normal means.
Also as stated earlier, Ubuntu already has a sophisticated high level mandatory access control system known as AppArmor, and therefore it has to be disabled prior to installing SeLinux to avoid any conflicts. Use the following instructions to disable AppArmor and Enable SeLinux.
sudo /etc/init.d/apparmor stop
apt-get update && upgrade –yuf
apt-get install selinux
nano /etc/selinux/config
‘set SELINUX to permissive, SELINUXTYPE to default’
reboot

This file config can be opened with any text editor to make changes. The reason for assigning permissive rule to SETLINUX is making the operating system accessible while leaving SeLinux enabled. It’s highly recommended to use the permissive option as it’s hassle free, but it logs violated rules set in SeLinux.
Available Options
SELinux is a complex and a comprehensive module; hence it contains a lot of the features and options. That being said, most of these options may not be useful for everyone due to their exotic nature. The following options are some of the basic and useful options in this module. They are more than enough to get SELinux up and running.
Check the status: The status of SELinux can be checked directly through the terminal window, which shows the basic information like whether SeLinux is enabled, SELinux root directory, loaded policy name, current mode etc. After rebooting the system after installing SeLinux, use the following command as root user with sudo command. If it states SeLinux is enabled in the status section, it means it’s up and running in the background.
root@ubuntu:/home/dondilanga# sestatus

Change The Global Permission Level: The global permission level states how SELinux behaves when it stumbles upon a rule. By default, SeLinux sets itself to enforcing which effectively blocks all the requests, but it can be altered to permissive which is kind of lenient towards user as it allows access, but logs any violated rules in its log file.
nano /etc/selinux/config
‘set SELINUX to permissive or enforcing, SELINUXTYPE to default’
Check the Log File: The log file which states the violated rules by each request. This only keeps logs if SeLinux is enabled.
grep selinux /var/log/audit/audit.log
Enable and Disable Policies and What Protections They Offer: This is one of the most important options in SeLinux, as it allows to enable and disable policies. SeLinux has a large number of prebuilt policies which determine whether the specified request is allowed or not. Some of the example of this are allow_ftpd_full_access which determines the ability of FTP service to log in to local users and read write all files on the system, allow_ssh_keysign which allows keys to be used when login to SSH, allow_user_mysql_connect which allows users to connect to mysql , httpd_can_sendmail which determines the ability of HTTP service to send an email etc.. In the following code example, it installs policycoreutils-python-utils which actually helps in listing out each policy in a descriptive manner, next it lists out all available policies to terminal, finally it teaches how to set a policy on or off, the allow_ftpd_full_access is the policy name as shown in the terminal returned by semanage,
apt-get install policycoreutils-python-utils
semanage boolean -l
setsebool -P allow_ftpd_full_access ON
Advanced Options
The advanced options are options which help in extending the functionalities in SELInux. There is tremendous amount of combinations out there due to the comprehensive nature of SeLinux, so this article lists out some of the prominent and useful ones among them.
Role Based Access Control (RBAC): RBAC allows administrators to switch to a role based way to confine the permission of applications. What it means is a user of a particular user group is allowed to execute or perform certain predefined actions. As long as the user is part of the role it’s okay. This is the same thing as switching to root when installing applications on Linux with administrative rights.
semanage login -a -s 'myrole' -r 's0-s0:c0.c1023' <username>
Users can switch their role with the following command.
sudo -r new_role_r -i
Users can also remotely connect to the server via SSH with the role enabled at the startup.
ssh <username>/[email protected]
Allow A Service to Listen to a Non-Standard Port: This is quite useful in customizing a service, for instance when a FTP port is changed to a non-standard one in order to avoid unauthorized accesses, SELinux has to be informed accordingly to allow such ports to pass through and function as usual. The following example allows the FTP port to listen to 992 port. Likewise, any service returned by semanage port –l can be replaced. Some of the popular ports are http_port_t , pop_port_t, ssh_port_t.
semanage port -a -t <port to allow> <protocol> <port number>
semanage port -a -t ftp_port_t  -p tcp 992
How to Disable
Disabling SELinux is easier as it’s enabled and installed. Basically there are two ways of disabling it. Either temporarily or permanently. Disabling SeLinux temporary makes it disable for a while until the next boot, and as soon as the computer is turned on again the state is restarted. On the other hand, the permanent disable of SeLinux shuts it down completely exposing it to threats out there; hence it’s a wise choice to restore Ubuntu’s default AppArmor at least for the sake of security of system.
The following command on the terminal turns it off temporarily:
setenforce 0
To permanently disabled edit /etc/selinux/config and set SELINUX to disabled. ]]>