Prerequisite
You have to install the necessary python library to read data from Kafka. Python3 is used in this tutorial to write the script of consumer and producer. If the pip package is not installed before in your Linux operating system then you have to install pip before installing the Kafka library for python. python3-kafka is used in this tutorial to read data from Kafka. Run the following command to install the library.
Reading simple text data from Kafka
Different types of data can be sent from the producer on a particular topic that can be read by the consumer. How a simple text data can be sent and received from Kafka using producer and consumer is shown in this part of this tutorial.
Create a file named producer1.py with the following python script. KafkaProducer module is imported from the Kafka library. The broker list needs to define at the time of producer object initialization to connect with the Kafka server. The default port of Kafka is ‘9092’. bootstrap_servers argument is used to define the hostname with the port. ‘First_Topic‘ is set as a topic name by which text message will be sent from the producer. Next, a simple text message, ‘Hello from Kafka’ is sent using send() method of KafkaProducer to the topic, ‘First_Topic’.
producer1.py:
from kafka import KafkaProducer
# Define server with port
bootstrap_servers = ['localhost:9092']
# Define topic name where the message will publish
topicName = 'First_Topic'
# Initialize producer variable
producer = KafkaProducer(bootstrap_servers = bootstrap_servers)
# Publish text in defined topic
producer.send(topicName, b'Hello from kafka...')
# Print message
print("Message Sent")
Create a file named consumer1.py with the following python script. KafkaConsumer module is imported from the Kafka library to read data from Kafka. sys module is used here to terminate the script. The same hostname and port number of the producer are used in the script of the consumer to read data from Kafka. The topic name of the consumer and the producer must be the same that is ‘First_topic’. Next, the consumer object is initialized with the three arguments. Topic name, group id and server information. for loop is used here to read the text send from Kafka producer.
consumer1.py:
from kafka import KafkaConsumer
# Import sys module
import sys
# Define server with port
bootstrap_servers = ['localhost:9092']
# Define topic name from where the message will recieve
topicName = 'First_Topic'
# Initialize consumer variable
consumer = KafkaConsumer (topicName, group_id ='group1',bootstrap_servers =
bootstrap_servers)
# Read and print message from consumer
for msg in consumer:
print("Topic Name=%s,Message=%s"%(msg.topic,msg.value))
# Terminate the script
sys.exit()
Output:
Run the following command from one terminal to execute the producer script.
The following output will appear after sending the message.

Run the following command from another terminal to execute the consumer script.
The output shows the topic name and the text message sent from the producer.

Reading JSON formatted data from Kafka
JSON formatted data can be sent by the Kafka producer and read by Kafka consumer using the json module of python. How JSON data can be serialized and de-serialized before sending and receiving the data using the python-kafka module is shown in this part of this tutorial.
Create a python script named producer2.py with the following script. Another module named JSON is imported with KafkaProducer module here. value_serializer argument is used with bootstrap_servers argument here to initialize the object of Kafka producer. This argument indicates that JSON data will be encoded using ‘utf-8‘ character set at the time of sending. Next, JSON formatted data is sent to the topic named JSONtopic.
producer2.py:
from kafka import KafkaProducer
# Import JSON module to serialize data
import json
# Initialize producer variable and set parameter for JSON encode
producer = KafkaProducer(bootstrap_servers =
['localhost:9092'],value_serializer=lambda v: json.dumps(v).encode('utf-8'))
# Send data in JSON format
producer.send('JSONtopic', {'name': 'fahmida','email':'[email protected]'})
# Print message
print("Message Sent to JSONtopic")
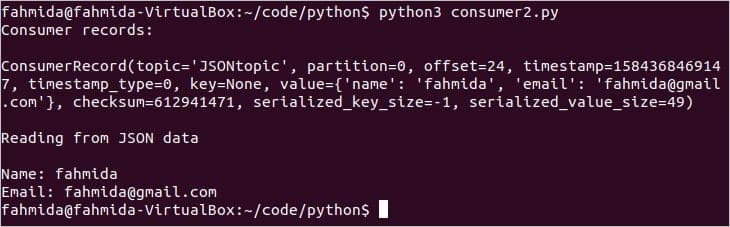
Create a python script named consumer2.py with the following script. KafkaConsumer, sys and JSON modules are imported in this script. KafkaConsumer module is used to read JSON formatted data from the Kafka. JSON module is used to decode the encoded JSON data send from the Kafka producer. Sys module is used to terminate the script. value_deserializer argument is used with bootstrap_servers to define how JSON data will be decoded. Next, for loop is used to print all the consumer records and JSON data retrieved from Kafka.
consumer2.py:
from kafka import KafkaConsumer
# Import sys module
import sys
# Import json module to serialize data
import json
# Initialize consumer variable and set property for JSON decode
consumer = KafkaConsumer ('JSONtopic',bootstrap_servers = ['localhost:9092'],
value_deserializer=lambda m: json.loads(m.decode('utf-8')))
# Read data from kafka
for message in consumer:
print("Consumer records:\n")
print(message)
print("\nReading from JSON data\n")
print("Name:",message[6]['name'])
print("Email:",message[6]['email'])
# Terminate the script
sys.exit()
Output:
Run the following command from one terminal to execute the producer script.
The script will print the following message after sending the JSON data.

Run the following command from another terminal to execute the consumer script.
The following output will appear after running the script.
Conclusion:
The data can be sent and received in different formats from Kafka using python. The data can also be stored into the database and retrieved from the database using Kafka and python. I home, this tutorial will help the python user to start working with Kafka.
]]>That overview is a bit in the abstract so let’s ground it in a real-world scenario, imagine you need to monitor several web servers. Each running its own website, and new logs are constantly being generated in each one of them every second of the day. On top of that there are a number of email servers that you need to monitor as well.
You may need to store that data for record keeping and billing purposes, which is a batch job that doesn’t require immediate attention. You might want to run analytics on the data to make decisions in real-time which requires accurate and immediate input of data. Suddenly you find yourself in the need for streamlining the data in a sensible way for all the various needs. Kafka acts as that layer of abstraction to which multiple sources can publish different streams of data and a given consumer can subscribe to the streams it finds relevant. Kafka will make sure that the data is well-ordered. It is the internals of Kafka that we need to understand before we get to the topic of Partitioning and Keys.
Kafka Topics, Broker and Partitions
Kafka Topics are like tables of a database. Each topic consists of data from a particular source of a particular type. For example, your cluster’s health can be a topic consisting of CPU and memory utilization information. Similarly, incoming traffic to across the cluster can be another topic.
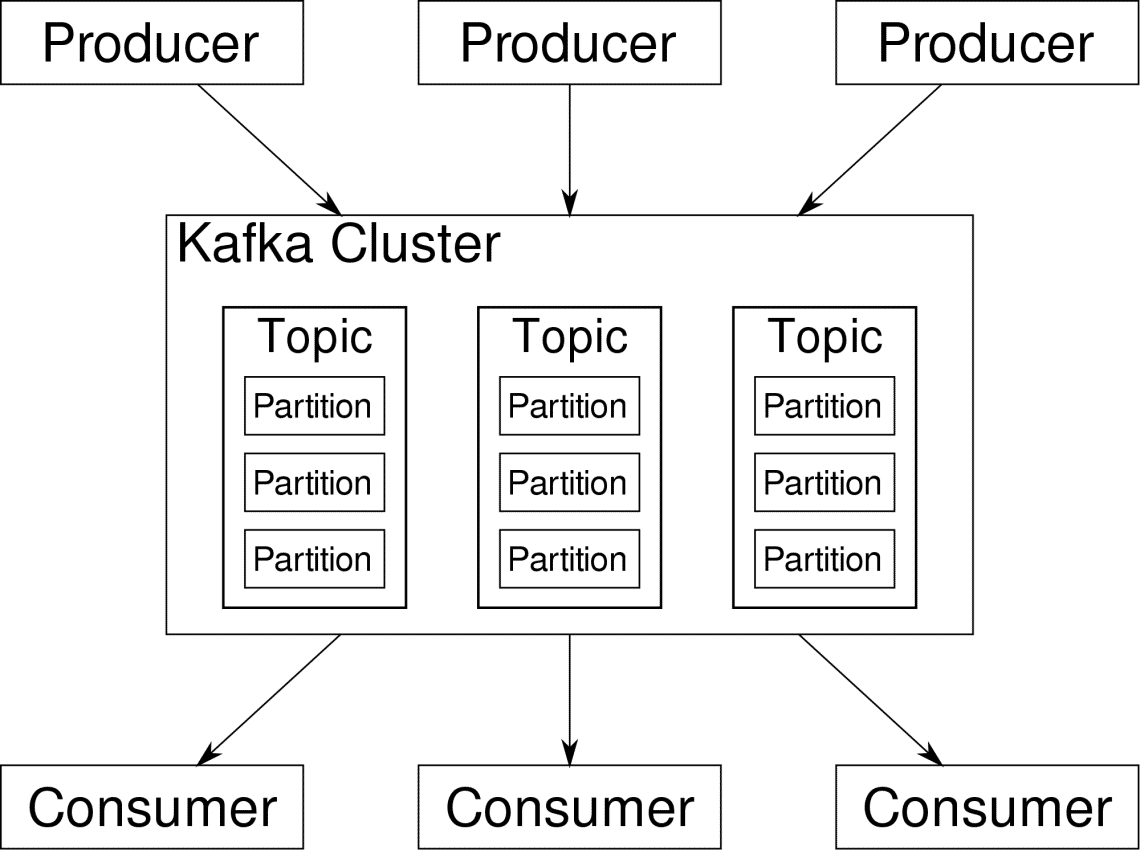
Kafka is designed to be horizontally scalable. That is to say, a single instance of Kafka consists of multiple Kafka brokers running across multiple nodes, each can handle streams of data parallel to the other. Even if a few of the nodes fail your data pipeline can continue to function. A particular topic can then be split into a number of partitions. This partitioning is one of the crucial factors behind the horizontal scalability of Kafka.
Multiple producers, data sources for a given topic, can write to that topic simultaneously because each writes to a different partition, at any given point. Now, usually data is assigned to a partition randomly, unless we provide it with a key.
Partitioning and Ordering
Just to recap, producers are writing data to a given topic. That topic is actually split into multiple partitions. And each partition lives independently of the others, even for a given topic. This can lead to a lot of confusion when the ordering to data matters. Maybe you need your data in a chronological order but having multiple partitions for your datastream doesn’t guarantee perfect ordering.
You can use only a single partition per topic, but that defeats the whole purpose of Kafka’s distributed architecture. So we need some other solution.
Keys for Partitions
Data from a producer are sent to partitions randomly, as we mentioned before. Messages being the actual chunks of data. What producers can do besides just sending messages is to add a key that goes along with it.
All the messages that come with the specific key will go to the same partition. So, for example, a user’s activity can be tracked chronologically if that user’s data is tagged with a key and so it always end up in one partition. Let’s call this partition p0 and the user u0.
Partition p0 will always pick up the u0 related messages because that key tie them together. But that doesn’t mean that p0 is only tied up with that. It can also take up messages from u1 and u2 if it has the capacity to do so. Similarly, other partitions can consume data from other users.
The point that a given user’s data isn’t spread across different partition ensuring chronological ordering for that user. However, the overall topic of user data, can still leverage the distributed architecture of Apache Kafka.
Conclusion
While distributed systems like Kafka solve some older problems like lack of scalability or having single a point of failure. They come with a set of problems that are unique to their own design. Anticipating these problems is an essential job of any system architect. Not only that, sometimes you really have to do a cost-benefit analysis to determine whether the new problems are a worthy trade-off for getting rid of the older ones. Ordering and synchronization are just the tip of the iceberg.
Hopefully, articles like these and the official documentation can help you along the way. ]]>
When talking about distributed systems like above, we run into the problem of analytics and monitoring. Each node is generating a lot of information about its own health (CPU usage, memory, etc) and about application status along with what the users are trying to do. These details must be recorded in:
- The same order in which they are created,
- Seperated in terms of urgency (real-time analytics or batches of data), and most importantly,
- The mechanism with which they are collected must itself be a distributed and scalable, otherwise we are left with a single point of failure. Something the distributed system design was supposed to avoid.
Why Use Kafka?
Apache Kafka is pitched as a Distributed Streaming Platform. In Kafka lingo, Producers continuously generate data (streams) and Consumers are responsible for processing, storing and analysing it. Kafka Brokers are responsible for ensuring that in a distributed scenario the data can reach from Producers to Consumers without any inconsistency. A set of Kafka brokers and another piece of software called zookeeper constitute a typical Kafka deployment.
The stream of data from many producers needs to be aggregated, partitioned and sent to multiple consumers, there’s a lot of shuffling involved. Avoiding inconsistency is not an easy task. This is why we need Kafka.

The scenarios where Kafka can be used is quite diverse. Anything from IOT devices to cluster of VMs to your own on-premise bare metal servers. Anywhere where a lot of ‘things’ simultaneously want your attention….That’s not very scientific is it? Well the Kafka architecture is a rabbit-hole of its own and deserves an independent treatment. Let’s first see a very surface level deployment of the software.
Using Docker Compose
In whatever imaginative way you decide to use Kafka, one thing is certain — You won’t be using it as a single instance. It is not meant to be used that way, and even if your distributed app needs only one instance (broker) for now, it will eventually grow and you need to make sure that Kafka can keep up.
Docker-compose is the perfect partner for this kind of scalability. Instead for running Kafka brokers on different VMs, we containerize it and leverage Docker Compose to automate the deployment and scaling. Docker containers are highly scalable on both single Docker hosts as well as across a cluster if we use Docker Swarm or Kubernetes. So it makes sense to leverage it to make Kafka scalable.
Let’s start with a single broker instance. Create a directory called apache-kafka and inside it create your docker-compose.yml.
$ cd apache-kafka
$ vim docker-compose.yml
The following contents are going to be put in your docker-compose.yml file:
services:
zookeeper:
image: wurstmeister/zookeeper
kafka:
image: wurstmeister/kafka
ports:
- "9092:9092"
environment:
KAFKA_ADVERTISED_HOST_NAME: localhost
KAFKA_ZOOKEEPER_CONNECT: zookeeper:2181
Once you have saved the above contents in your compose file, from the same directory run:
Okay, so what did we do here?
Understanding the Docker-Compose.yml
Compose will start two services as listed in the yml file. Let’s look at the file a bit closely. The first image is zookeeper which Kafka requires to keep track of various brokers, the network topology as well as synchronizing other information. Since both zookeeper and kafka services are going to be a part of the same bridge network (this is created when we run docker-compose up ) we don’t need to expose any ports. Kafka broker can talk to zookeeper and that’s all the communication zookeeper needs.
The second service is kafka itself and we are just running a single instance of it, that is to say one broker. Ideally, you would want to use multiple brokers in order to leverage the distributed architecture of Kafka. The service listens on port 9092 which is mapped onto the same port number on the Docker Host and that’s how the service communicates with the outside world.
The second service also has a couple of environment variables. First, is KAFKA_ADVERTISED_HOST_NAME set to localhost. This is the address at which Kafka is running, and where producers and consumers can find it. Once again, this should be the set to localhost but rather to the IP address or the hostname with this the servers can be reached in your network. Second is the hostname and port number of your zookeeper service. Since we named the zookeeper service…well, zookeeper that’s what the hostname is going to be, within docker bridge network we mentioned.
Running a simple message flow
In order for Kafka to start working, we need to create a topic within it. The producer clients can then publish streams of data (messages) to the said topic and consumers can read the said datastream, if they are subscribed to that particular topic.
To do this we need to start a interactive terminal with the Kafka container. List the containers to retrieve the kafka container’s name. For example, in this case our container is named apache-kafka_kafka_1
With kafka container’s name, we can now drop inside this container.
bash-4.4#
Open two such different terminals to use one as consumer and another producer.
Producer Side
In one of the prompts (the one you choose to be producer), enter the following commands:
bash-4.4# kafka-topics.sh --create --zookeeper zookeeper:2181 --replication-factor 1
--partitions 1 --topic test
## To start a producer that publishes datastream from standard input to kafka
bash-4.4# kafka-console-producer.sh --broker-list localhost:9092 --topic test
>
The producer is now ready to take input from keyboard and publish it.
Consumer Side
Move on the to the second terminal connected to your kafka container. The following command starts a consumer which feeds on test topic:
Back to Producer
You can now type messages in the new prompt and everytime you hit return the new line is printed in the consumer prompt. For example:
This message gets transmitted to the consumer, through Kafka, and you can see it printed at the consumer prompt.
Real-World Setups
You now have a rough picture of how Kafka setup works. For your own use case, you need to set a hostname which is not localhost, you need multiple such brokers to be a part of your kafka cluster and finally you need to set up consumer and producer clients.
Here are a few useful links:
I hope you have fun exploring Apache Kafka.
]]>Whenever we want to integrate message brokers into our application which allows us to scale easily and connect our system in an asynchronous fashion, there are many message brokers which can make the list from which you are made to choose one, like:
Each of these message brokers have their own list of pros and cons but the most challenging options are the first two, RabbitMQ and Apache Kafka. In this lesson, we will list down points which can help to narrow down the decision of going with one over other. Finally, it is worth pointing out that none of these is better than another in all use-cases and it completely depends on what you want to achieve, so there is no one right answer!
We will start with a simple introduction of these tools.
Apache Kafka
As we said in this lesson, Apache Kafka is a distributed, fault-tolerant, horizontally-scalable, commit log. This means that Kafka can perform a divide and rule term very well, it can replicate your data to ensure availability and is highly scalable in the sense that you can include new servers at runtime to increase its capacity to manage more messages.

Kafka Producer and Consumer
RabbitMQ
RabbitMQ is a more general-purpose and simpler to use message broker which itself keeps record about what messages have been consumed by the client and persist the other one. Even if for some reason RabbitMQ server goes down, you can be sure that the messages currently present on queues have been stored on the Filesystem so that when RabbitMQ comes back up again, those messages can be processed by consumers in a consistent manner.

RabbitMQ Working
Superpower: Apache Kafka
Kafka’s main superpower is that it is can be used as a queue system but that is not what is limited to. Kafka is something more like a circular buffer that can scale as much as a disk on the machine on the cluster, and thus allows us to be able to re-read messages. This can be done by the client without having to depend on Kafka cluster as it is completely client’s responsibility to note the message metadata it is currently reading and it can revisit Kafka later in a specified interval to read the same message again.
Please note that the time in which this message can be re-read is limited and can be configured in Kafka configuration. So, once that time is over, there is no way a client can read an older message ever again.
Superpower: RabbitMQ
RabbitMQ’s main superpower is that it is simply scalable, is a high-performant queuing system which has very well-defined consistency rules, and ability to create many types of message exchange models. For example, there are three types of exchange you can create in RabbitMQ:
- Direct Exchange: One to one exchange of topic
- Topic Exchange: A topic is defined on which various producers can publish a message and various consumers can bind themselves to listen on that topic, so each one of them receives the message which is sent to this topic.
- Fanout exchange: This is more strict than topic exchange as when a message is published on a fanout exchange, all consumers which are connected to queues which binds itself to the fanout exchange will receive the message.
Already noticed the difference between RabbitMQ and Kafka? The difference is, if a consumer is not connected to a fanout exchange in RabbitMQ when a message was published, it will be lost because other consumers have consumed the message, but this doesn’t happen in Apache Kafka as any consumer can read any message as they maintain their own cursor.
RabbitMQ is broker-centric
A good broker is someone who guarantees the work it takes upon itself and that is what RabbitMQ is good at. It is tilted towards delivery guarantees between producers and consumers, with transient preferred over durable messages.
RabbitMQ uses the broker itself to manage the state of a message and making sure that each message is delivered to each entitled consumer.
RabbitMQ presumes that consumers are mostly online.
Kafka is producer-centric
Apache Kafka is producer-centric as it is completely based around partitioning and a stream of event packets containing data and transforming them into durable message brokers with cursors, supporting batch consumers that may be offline, or online consumers that want messages at low latency.
Kafka makes sure that the message remains safe until a specified period of time by replicating the message on its nodes in the cluster and maintaining a consistent state.
So, Kafka doesn’t presume that any of its consumers are mostly online and nor it cares.
Message Ordering
With RabbitMQ, the order of publishing is managed consistently and consumers will receive the message in the published order itself. On the other side, Kafka doesn’t do so as it presumes that published messages are heavy in nature so consumers are slow and can send messages in any order, so it doesn’t manage the order in its own as well. Though, we can set up a similar topology to manage the order in Kafka using the consistent hash exchange or sharding plugin., or even more kinds of topologies.
The complete task managed by Apache Kafka is to act like a “shock absorber” between the continuous flow of events and the consumers out of which some are online and others can be offline – only batch consuming on an hourly or even daily basis.
Conclusion
In this lesson, we studied the major differences (and similarities too) between Apache Kafka and RabbitMQ. In some environments, both have shown extraordinary performance like RabbitMQ consume millions of message per second and Kafka has consumed several millions of message per second. The main architectural difference is that RabbitMQ manages its messages almost in-memory and so, uses a big cluster (30+ nodes), whereas Kafka actually makes use of the powers of sequential disk I/O operations and requires less hardware.
Again, the usage of each of them still depends completely on the use-case in an application. Happy messaging !
]]>Basics of Apache Kafka Partitions:
To understand the basics of Apache Kafka Partitions, you need to know about Kafka Topic first.
A Topic is like a database in a SQL database such as MariaDB for Apache Kafka. A Topic has a name or identifier that you use to group messages in Apache Kafka.
A Partition is like a channel for each Topic. A Topic can have many Partitions or channels.
A network cable connecting two computers has two ends, one is sending data, the other one is receiving data. Just like that, Apache Kafka Topic has two ends, Producers and Consumers. A Producer creates messages, and sends them in one of the Partitions of a Topic. A Consumer on the other hand reads the messages from the Partitions of a Topic.
Multiple Partitions or channels are created to increase redundancy. It is also used to group messages in a specific Topic.
That’s the basics of Apache Kafka Partitions. You can learn more about Apache Kafka partitions on another dedicated article Apache Kafka Partitioning at https://linuxhint.com/apache-kafka-partitioning
Installing Apache Kafka:
I have a dedicated detailed article on how to Install Apache Kafka on Ubuntu, which you can read at https://linuxhint.com/install-apache-kafka-ubuntu/
With a little bit of tweaks, you can install Apache Kafka on other Linux distributions as well.
Starting Apache Kafka Server:
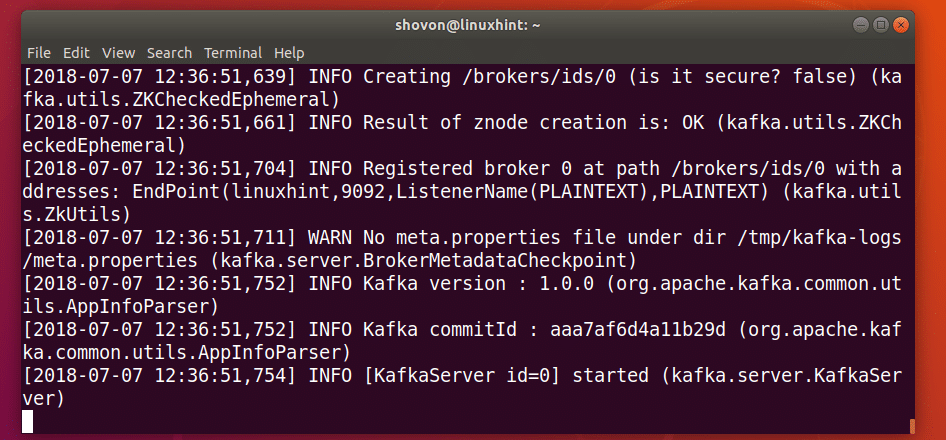
If you’ve followed my article to install Apache Kafka, then first start Apache Kafka server with the following command:
Apache Kafka server should start. Keep this terminal open as long as you want Apache Kafka server to run.
Creating an Apache Kafka Topic:
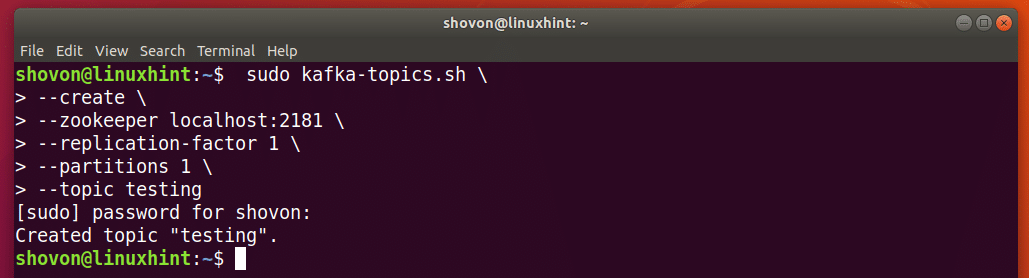
You can create an Apache Kafka Topic testing with the following command:
--create \
--zookeeper localhost:2181 \
--replication-factor 1 \
--partitions 1 \
--topic testing
The Topic testing should be created. This Topic has 1 partition.
If you want to create, let’s say N partitions, then set –partitions to N.
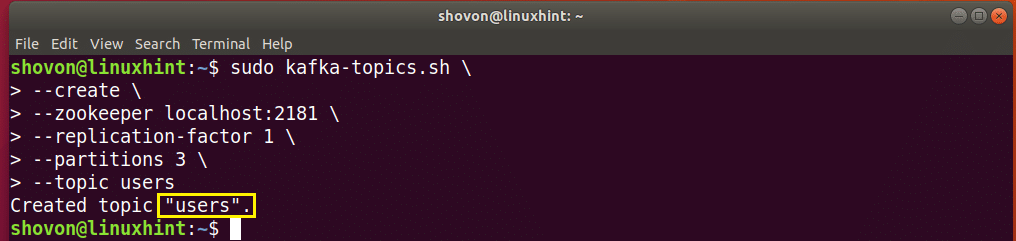
Let’s create another Topic, let’s say users, with 3 Partitions, then run the following command:
--create \
--zookeeper localhost:2181 \
--replication-factor 1 \
--partitions 3 \
--topic users
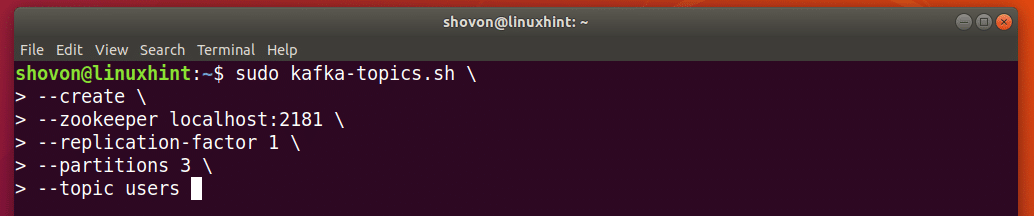
Topic users should be created with 3 Partitions.
Adding Partitioned Messages to the Topic:
A Partitioned message of a Topic has a key and a value. The key and value is usually separated by a comma or other special character. It does not matter what special character you use to separate the key and value pair. But you must use the same special character everywhere on that Topic. Otherwise things could go wrong.
The key is used to determine which Partition a message of a Topic belongs to. It should be unique on a Topic. If you have 3 Partitions, then you should use 3 different keys. So that the messages can be divided into 3 Partitions.
Let’s say our users Topic has 3 users with key 1, 2, and 3, each of them belongs to one of the 3 Partitions of the users Topic.
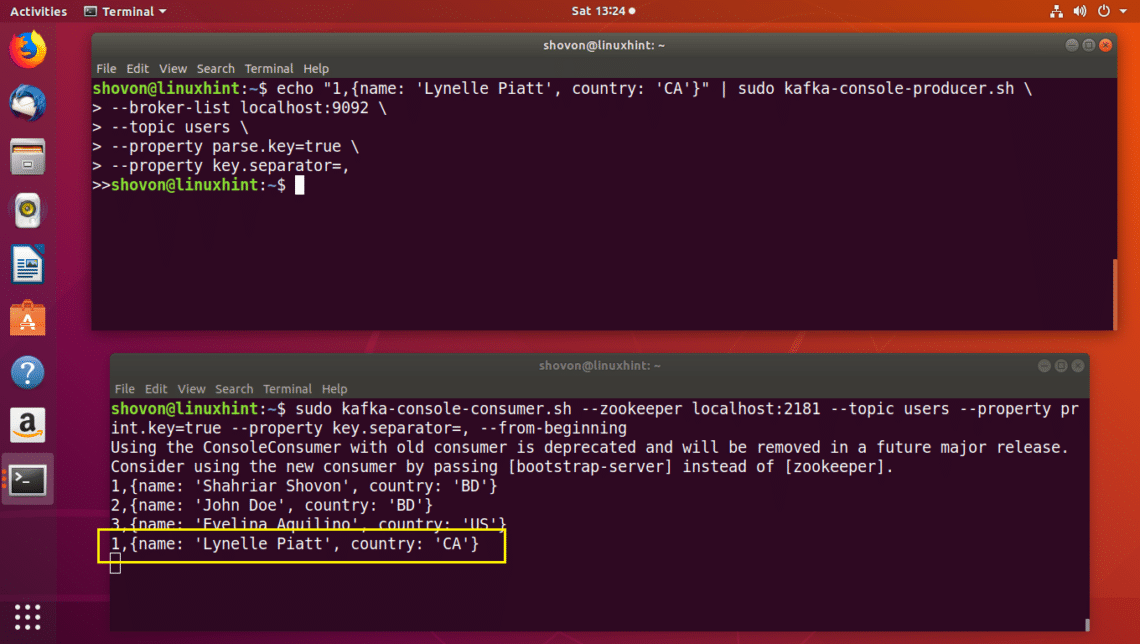
Run the following command to add the first user with key 1 using the Kafka Producer API:
--broker-list localhost:9092 \
--topic users \
--property parse.key=true \
--property key.separator=,

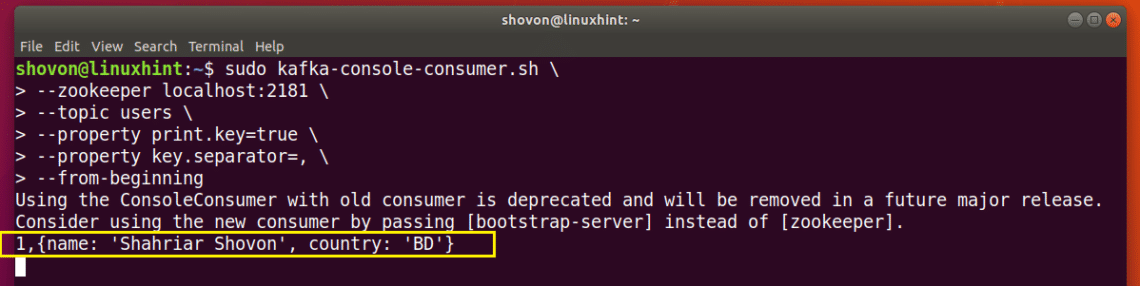
Now you can list the message from the users Topic using the Kafka Consumer API with the following command:
--zookeeper localhost:2181 \
--topic users \
--property print.key=true \
--property key.separator=, \
--from-beginning

As you can see, the key and value pair I just added to the users Topic is listed.
I am going to keep the Consumer program for users Topic open on this Terminal and add the other users to the users Topic from another Terminal and see what happens.
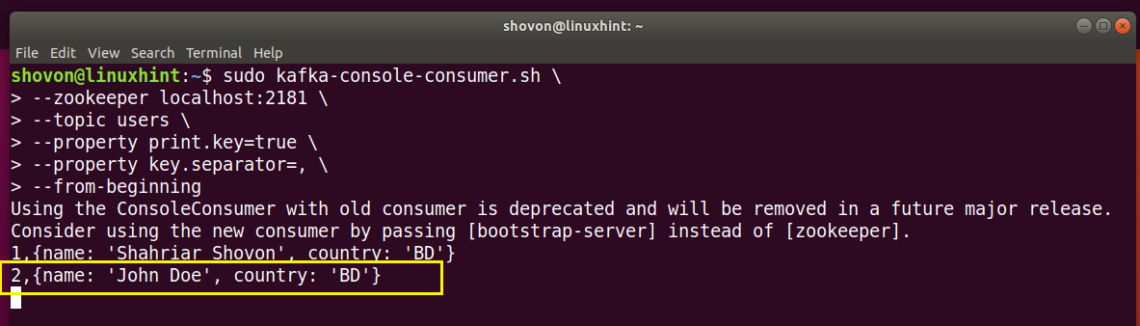
Add another user with key 2 with the following command:
--broker-list localhost:9092 \
--topic users \
--property parse.key=true \
--property key.separator=,

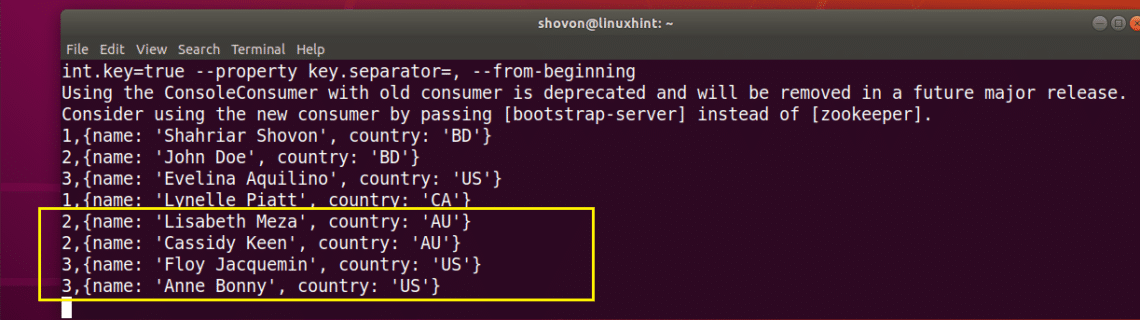
As you can see from the marked section of the screenshot below, the new user is listed on the Consumer program instantly.
Let’s add our last user with key 3 with the following command:
--broker-list localhost:9092 \
--topic users \
--property parse.key=true \
--property key.separator=,

As you can see, the new user is also listed in the Consumer program.

You can also add many users to the same Partition. Just make sure the key is the same.
Let’s add another user to the Partition with key 1:
--broker-list localhost:9092 \
--topic users \
--property parse.key=true \
--property key.separator=,

As you can see, the new user is added to the correct Partition of the users Topic.
I can keep adding random users to the users Topic and they will be send through the correct partition as you can see from the screenshot below.
So that’s how Partitions in Apache Kafka works. Every Partition is like a Queue, the first message you send through that partition is displayed first, and then the second message and so on in the order they are sent.
If you’re a Java developer, you can use Java programming language and Apache Kafka Java APIs to do interesting things with Apache Kafka Partitions. For example, you can assign different Partition for different chat rooms for your instant messaging app as messages must be displayed on the order they are sent.
So that’s all for today. Thank you for reading this article.
]]>Written by: By Raúl Estrada
Published by: Packt Publishing
Summary: Over 100 practical recipes on using distributed enterprise messaging to handle real-time data
Publisher Link: Apache Kafka 1.0 Cookbook
This book is a cookbook, a compendium of practical recipes that are solutions to everyday problems faced in the implementation of a streaming architecture with Apache Kafka.
Target Audience For This Book
You are an IT professional who works with software development and data processing but you have yet no experience with using Apache Kafka. This book is for you because it won’t take a lot of your time talking about theory but get right into how to setup Kafka and what you can do with it to build bigger, better and more robust systems then you have ever done before you learned how to use Apache Kafka.
Getting Started
The author gets you started right away by showing you how to install on various platforms all the software and dependencies including Scala programming language and Apache Zookeeper. Then install Apache Kafka and configure it like a real world system in cluster mode on a single host and start the server processes right away with the initial recipes. Brokers in Kafka are the servers themselves. It is shown how to configure and start them.
Creating your first topics
Quickly in Chapter 1, you will be using the command line interface to create topics in Apache Kafka. Topics are the core abstract that are used to store data and read from data. They are a linear set of unalterable messages that can be published to and read from with a message counter. You will also learn the command line interface tools to list, describe and inspect the topics.
Command Line Tools
A recipe is shown for using basic command line tools for generating data and inserting into a topic. The various useful options for inserting data via the command line interface are shown. The same options can be used from code itself rather than the command line. Then the command line tools for reading from a topic are shown. Again the same can be done either via command line or by writing code.
Optimizing the Install
You can modify change the threading options for performance and the replica options for reliability. Logging options can be modified to fine tune how you want to debug the logs. Zookeeper settings can also be tuned for performance and scalability. Quick recipes to get started with tuning these are shown in Chapter 1.
Core Content of Book
After the basics are covered the book goes into more advanced topics such as:
- Clustering: Different recipes for common topologies of deployment
- Message Validation: Override Producer class and ensure all messages are valid before putting in topic
- Message Enrichment: Override Producer and add more color to the data based on geolocation or any additional context
- Confluent Platform: Confluent is leading Apache Kafka vendor, see what they offer as added value
- Kafka Streams: Process data as it comes into a topic, Streaming, and handle data or write new data to a topic
- Monitoring & Management: Learn the best practices and recipes for production monitoring and management
- Security: Ensure you have secured your Kafka install with best practice recipes
- Integration with Open Source Projects: HDFS, ElasticSearch and other systems you can integrate Apache Kafka with
Outcomes
After going through the recipes in this book, you will no longer be a newbie. Now you will have deployed both simple and real world Apache Kafka topologies. You have written to and read from topics, and you have processed data in a streaming fashion. You have the basic skills you need to start leveraging this powerful technology in the real world. Get the book from Amazon today and start your learning path with it.
(This post contains affiliate links. It is a way for this site to earn advertising fees by advertising or linking to certain products and/or services.) ]]>
What Is Apache Kafka?
Apache Kafka an open-source distributed streaming platform capable of three main things: it can publish and subscribe to streams of records, store streams of records in a fault-tolerant durable way, and process streams of records as they occur.
Apache Kafka was originally developed by LinkedIn to provide a unified, high-throughput, low-latency platform for handling real-time data feeds. Today, Apache Kafka supports both customer-facing applications and connecting downstream systems with real-time data.
Best Apache Kafka Books
Kafka: The Definitive Guide: Real-Time Data and Stream Processing at Scale
This practical guide was written for software engineers who develop applications that use Kafka’s APIs. It’s also suitable for production engineers who install, configure, tune, and monitor Apache Kafka in production. Its author, Neha Narkhede, is co-founder and CTO at Confluent, and she was responsible for the streaming infrastructure built on top of Apache Kafka and Apache Samza when she worked at LinkedIn. Her vast experience emits from every page of this book. If you’re looking for a quick yet detailed introduction to Apache Kafka, this is the book you should start with.
Apache Kafka 1.0 Cookbook
We firmly believe that all developers should strive to learn as much about the tools they work with as possible, but we also acknowledge that developing solutions at the speed of business sometimes means skipping the technical stuff and figuring things out as you go. If you’d like to see how Apache Kafka can be integrated with other important big data tools, you should add this book to your library because it contains over 100 practical recipes on using distributed enterprise messaging to handle real-time data.
Streaming Systems: The What, Where, When, and How of Large-Scale Data Processing
This practical book has been written for those who would like to explore streaming systems and learn how they are used by data engineers, data scientists, and developers to process event-time data. The book is conceptual and platform-agnostic, making it a great resource not only for Apache Kafka developers but also for everyone else.
Designing Data-Intensive Applications: The Big Ideas Behind Reliable, Scalable, and Maintainable Systems
From Facebook to Google to startups of many different kinds, data is everywhere today, and those who know how to leverage it to their benefit lead the pack. This book covers data-intensive applications and their design. It’s practical yet comprehensive, and its author, Martin Kleppmann, does a fantastic job helping the reader navigate the increasingly complex field of designing data-driven applications.
Streaming Architecture: New Designs Using Apache Kafka and MapR Streams
The authors of this book cover key elements in good design for streaming analytics, new messaging technologies, including Apache Kafka and MapR Streams, technology choices for streaming analytics, and a lot more. The book is intended for developers and non-technical people alike, and we can wholeheartedly recommend it anyone who would like to know how Apache Kafka fits into the broader stream processing landscape.
(This post contains affiliate links. It is a way for this site to earn advertising fees by advertising or linking to certain products and/or services.) ]]>
Please note that this is not an introductory lesson. Please read What is Apache Kafka and how does it work before you continue with this lesson to gain a deeper insight.
Topics in Kafka
A Topic in Kafka is something where a message is sent. The consumer applications which are interested in that topic pulls the message inside that topic and can do anything with that data. Up to a specific time, any number of consumer applications can pull this message any number of times.
Consider a Topic like LinuxHint’s Ubuntu Blog page. The lessons are put their till eternity and any number of enthusiast readers can come and read these lessons any number of times or move to the next lesson as they wish. These readers can be interested in other topics from LinuxHint as well.
Topic Partitioning
Kafka is designed to manage heavy applications and queue a large number of messages which are kept inside a topic. To ensure high fault tolerance, each Topic is divided into multiple topic partitions and each Topic Partition in managed on a separate node. If one of the nodes go down, another node can act as the topic leader and can server topics to the interested consumers. Here is how the same data is written to multiple Topic Partitions:
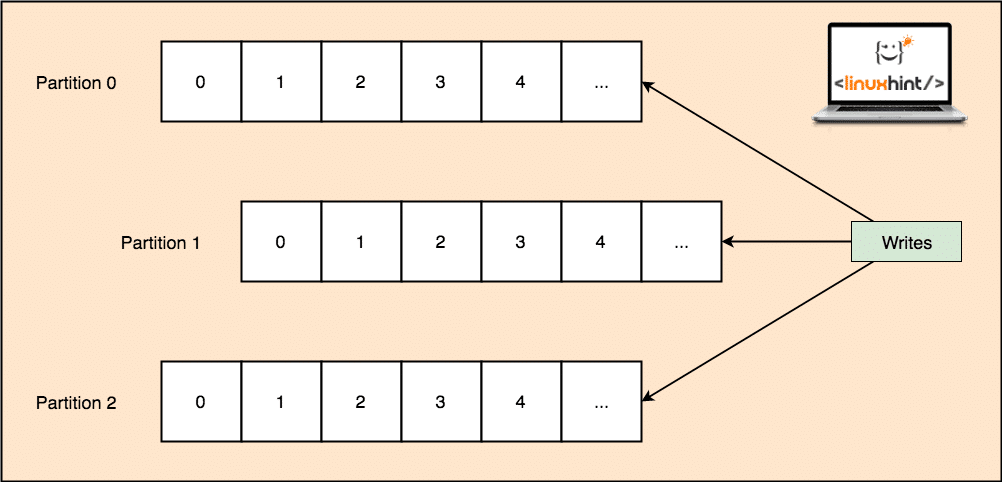
Topic Partitions
Now, the above image shows how same data is replicated across multiple partitions. Let’s visualise how different partitions can act as a leader on different nodes/partitions:
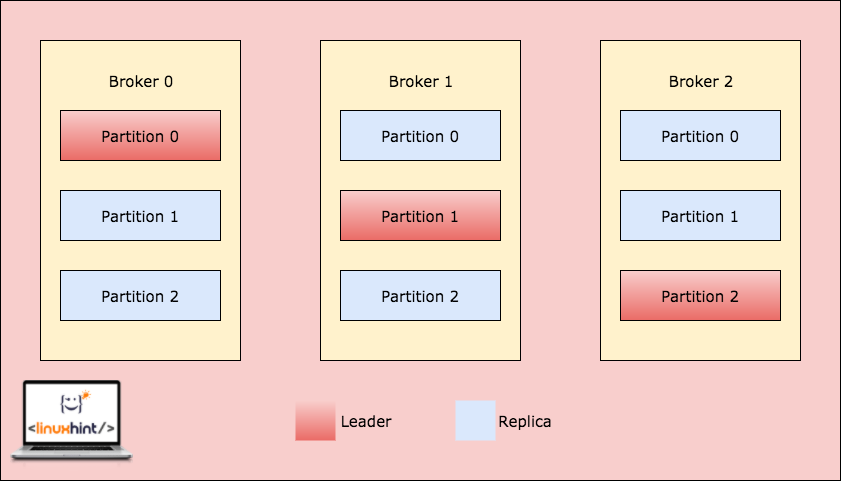
Kafka Broker Partitioning
When a client writes something to a topic at a position for which Partition in Broker 0 is the leader, this data is then replicated across the brokers/nodes so that message remains safe:

Replication across Broker Partitions
More Partitions, Higher Throughput
Kafka makes use of Parallelism to provide very high throughput to producer and consumer applications. Actually, through the same way, it also maintains its status of being a highly-fault tolerant system. Let’s understand how high throughput is achieved with Parallelism.
When a Producer application writes some message to a Partition in Broker 0, Kafka opens multiple threads in parallel so that message can be replicated across all the selected Brokers at the same time. On the Consumer side, a consumer application consumes messages from a single partition through a thread. The more the number of Partitions, the more consumer threads can be opened so that all of them can work in parallel as well. This means the more the number of partitions in a cluster, the more parallelism can be exploited, creating a very high throughput system.
More Partitions need more File Handlers
Just so you studied above how we can increase a Kafka system performance by just increasing the number of partitions. But we need to be careful with what limit are we moving towards.
Each Topic Partition in Kafka is mapped to a directory in the file system of the Server broker where it is running. Within that log directory, there will be two files: one for the index and another for the actual data per log segment. Currently, in Kafka, each broker opens a file handle for both the index and the data file of every log segment. This means that if you have 10,000 Partitions on a single Broker, this will result in 20,000 File Handlers running in parallel. Although, this is just about the configuration of the Broker. If the system on which the Broker is deployed has a high configuration, this will hardly be an issue.
Risk with high number of Partitions
As we saw in the images above, Kafka makes use of intra-cluster replication technique to replicate a message from a leader to the Replica partitions which lie in other Brokers. Both the producer and consumer applications read and write to a partition which is currently the leader of that partition. When a broker fails, the leader on that Broker will become unavailable. The metadata about who is the leader is kept in Zookeeper. Based on this metadata, Kafka will automatically assign the leadership of the partition to another partition.
When a Broker is shut down with a clean command, the controller node of Kafka cluster will move the leaders of the shutting down broker serially i.e. one at a time. if we consider moving a single leader takes 5 milliseconds, the unavailability of the leaders won’t disturb consumers as unavailability is for a very short period of time. But if we consider when the Broker is killed in an unclean manner and this Broker contains 5000 partitions and out of these, 2000 were the partition leaders, assigning new leaders for all these partitions will take 10 seconds which is very high when it comes to highly in-demand applications.
Conclusion
If we consider as a high-level thinker, more partitions in a Kafka cluster leads to a higher throughput of the system. Keeping this efficiency in mind, one also has to consider the configuration of the Kafka cluster we need to maintain, the memory we need to assign to that cluster and how we can manage the availability and latency if something goes wrong.
Read more Ubuntu based posts here and much more about Apache kafka as well. ]]>
To complete this lesson, you must have an active installation for Kafka on your machine. Read Install Apache Kafka on Ubuntu to know how to do this.
Installing Python client for Apache Kafka
Before we can start working with Apache Kafka in Python program, we need to install the Python client for Apache Kafka. This can be done using pip (Python package Index). Here is a command to achieve this:
This will be a quick installation on the terminal:
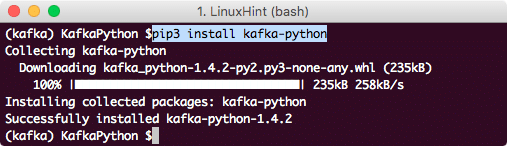
Python Kafka Client Installation using PIP
Now that we have an active installation for Apache Kafka and we have also installed the Python Kafka client, we’re ready to start coding.
Making a Producer
The first thing to have to publish messages on Kafka is a producer application which can send messages to topics in Kafka.
Note that Kafka producers are asynchronous message producers. This means that the operations done while a message is published on Kafka Topic partition are non-blocking. To keep things simple, we will write simple JSON publisher for this lesson.
To start, make an instance for the Kafka Producer:
import json
import pprint
producer = KafkaProducer(
bootstrap_servers='localhost:9092',
value_serializer=lambda v: json.dumps(v).encode('utf-8'))
The bootstrap_servers attribute informs about the host & port for the Kafka server. The value_serializer attribute is just for the purpose of JSON serialization of JSON Values encountered.
To play with the Kafka Producer, let’s try printing the metrics related to the Producer and Kafka cluster:
pprint.pprint(metrics)
We will see the following out now:

Kafka Mterics
Now, let’s finally try sending some message to the Kafka Queue. A simple JSON Object will be a good example:
The linuxhint is the topic partition on which the JSON Object will be sent on. When you run the script, you won’t get any output as the message is just sent to the topic partition. It’s time to write a consumer so that we can test our application.
Making a Consumer
Now, we’re ready to make a new connection as a Consumer application and getting the messages from the Kafka Topic. Start with making a new instance for the Consumer:
from kafka import TopicPartition
print('Making connection.')
consumer = KafkaConsumer(bootstrap_servers='localhost:9092')
Now, assign a topic to this connection and a possible offset value as well.
consumer.assign([TopicPartition('linuxhint', 2)])
Finally, we’re ready to print the mssage:
for message in consumer:
print("OFFSET: " + str(message[0])+ "\t MSG: " + str(message))
Through this, we will get a list of all published messages on the Kafka Consumer Topic Partition. The output for this program will be:
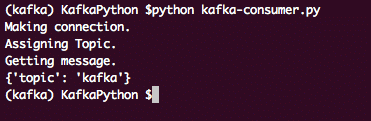
Kafka Consumer
Just for a quick reference, here is the complete Producer script:
import json
import pprint
producer = KafkaProducer(
bootstrap_servers='localhost:9092',
value_serializer=lambda v: json.dumps(v).encode('utf-8'))
producer.send('linuxhint', {'topic': 'kafka'})
# metrics = producer.metrics()
# pprint.pprint(metrics)
And here is the complete Consumer program we used:
from kafka import TopicPartition
print('Making connection.')
consumer = KafkaConsumer(bootstrap_servers='localhost:9092')
print('Assigning Topic.')
consumer.assign([TopicPartition('linuxhint', 2)])
print('Getting message.')
for message in consumer:
print("OFFSET: " + str(message[0])+ "\t MSG: " + str(message))
Conclusion
In this lesson, we looked at how we can install and start using Apache Kafka in our Python programs. We showed how easy it is to perform simple tasks related to Kafka in Python with the demonstrated Kafka Client for Python.
]]>In this lesson, we will see what is Apache Kafka and how does it work along with its some most common use-cases. Apache Kafka was originally developed at LinkedIn in 2010 and moved to become a top-level Apache project in 2012. It has three main components:
- Publisher-Subscriber: This component is responsible for managing and delivering data efficiently across the Kafka Nodes and consumer applications which scale a lot (like literally).
- Connect API: The Connect API is the most useful feature for Kafka and allows Kafka integration with many external data sources and data sinks.
- Kafka Streams: Using Kafka Streams, we can consider processing incoming data at scale in near real-time.
We will study a lot more Kafka concepts in coming sections. Let’s move ahead.
Apache Kafka Concepts
Before we dig deeper, we need to be thorough about some concepts in Apache Kafka. Here are the terms we should know, very briefly:
-
- Producer: This is an application which sends message to Kafka
- Consumer: This is an application which consumes data from Kafka
- Message: Data which is sent by Producer application to Consumer application through Kafka
- Connection: Kafka establishes TCP Connection between the Kafka cluster and the applications
- Topic: A Topic is a category to whom sent data is tagged and delivered to interested consumer applications
- Topic partition: As a single topic can get a lot of data at one go, to keep Kafka horizontally scalable, each topic is divided into partitions and each partition can live on any node machine of a cluster. Let us try to present it:
Topic Partitions
- Replicas: As we studied above that a topic is divided into partitions, each message record is replicated on multiple nodes of the cluster to maintain the order and data of each record in case one of the node dies.
- Consumer Groups: Multiple consumers who are interested in the same topic can be kept in a group which is termed as a Consumer Group
- Offset: Kafka is scalable as it is the consumers who actually store which message was fetched by them last as an ‘offset’ value. This means that for the same topic, Consumer A’s offset might have a value of 5 which means that it needs to process the sixth packet next and for the Consumer B, offset value could be 7 which means it needs to process eighth packet next. This completely removed the dependency on the topic itself for storing this meta-data related to each consumer.
- Node: A node is a single server machine in the Apache Kafka cluster.
- Cluster: A cluster is a group of nodes i.e., a group of servers.
The concept for Topic, Topic Partitions and offset can also be made clear with an illustrative figure:
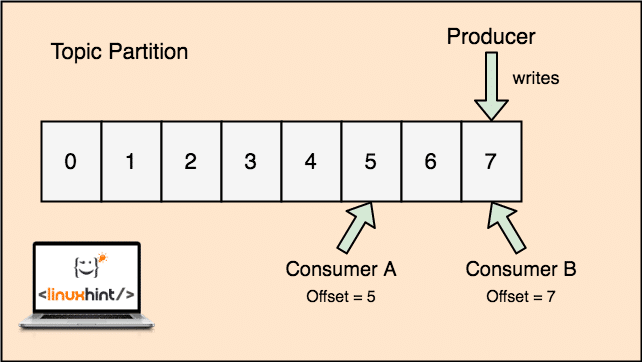
Topic partion and Consumer offset in Apache Kafka
Apache Kafka as Publish-subscribe messaging system
With Kafka, the Producer applications publish messages which arrives at a Kafka Node and not directly to a Consumer. From this Kafka Node, messages are consumed by the Consumer applications.
Kafka Producer and Consumer
As a single topic can get a lot of data at one go, to keep Kafka horizontally scalable, each topic is divided into partitions and each partition can live on any node machine of a cluster.
Again, Kafka Broker doesn’t keep records of which consumer has consumed how many packets of data. It is the consumers responsibility to keep track of data it has consumed. Due to the reason that Kafka doesn’t keep track of acknowledgements and messages of each consumer application, it can manage many more consumers with negligible impact on throughput. In production, many applications even follow a pattern of batch consumers, which means that a consumer consumes all the messages in a queue at a regular interval of time.
Installation
To start using Apache Kafka, it must be installed on the machine. To do this, read Install Apache Kafka on Ubuntu.
Use Case: Website Usage Tracking
Kafka is an excellent tool to be used when we need to track activity on a website. The tracking data includes and not limited to page views, searches, uploads or other actions users may take. When a user is on a website, the user might take any number of actions when he/she surfs through the website.
For example, when a new user registers on a website, the activity might be tracked on in what order does a new user explores the features of a website, if user sets their profile as needed or prefers to directly leap on to the features of the website. Whenever the user clicks a button, the metadata for that button is collected in a data packet and sent to the Kafka cluster from where the analytics service for the application can collect this data and produce useful insights on the related data. If we look to divide the tasks into steps, here is how the process will look like:
- A user registers on a website and enters into the dashboard. The user tries to access a feature straightaway by interacting with a button.
- The web application constructs a message with this metadata to a topic partition of topic “click”.
- The message is appended to the commit log and offset is incremented
- The consumer can now pull the message from the Kafka Broker and show website usage in real-time and show past data if it resets its offset to a possible past value
Use Case: Message Queue
Apache Kafka is an excellent tool which can act as a replacement for message broker tools like RabbitMQ. Asynchronous messaging helps in decoupling the applications and creates a highly scalable system.
Just like the concept of microservices, instead of building one large application, we can we can divide the application into multiple parts and each part has a very specific responsibility. This way, the different parts can be written in completely independent programming languages as well! Kafka has in-built partitioning, replication, and fault-tolerance system that makes it good as a large-scale message broker system.
Recently, Kafka is also seen as a very good log collection solution which can manage log file collection server broker and provide these files to a central system. With Kafka, it is possible to generate any event that you want any other part of your application to know about.
Using Kafka at LinkedIn
It is interesting to note that Apache Kafka was earlier seen and used as a way through which data pipelines could be made consistent and through which data was ingested into Hadoop. Kafka worked excellently when multiple data sources and destinations were present and providing a separate pipeline process for each combination of source and destination was not possible. LinkedIn’s Kafka architect, Jay Kreps describes this familiar problem well in a blog post:
My own involvement in this started around 2008 after we had shipped our key-value store. My next project was to try to get a working Hadoop setup going, and move some of our recommendation processes there. Having little experience in this area, we naturally budgeted a few weeks for getting data in and out, and the rest of our time for implementing fancy prediction algorithms. So began a long slog.
Apache Kafka and Flume
If you move out to compare these two on the basis of their functions, you’ll find a lot of common features. Here are some of them:
- It is recommended to use Kafka when you’ve multiple applications consuming the data instead of Flume, which is specially made to be integrated with Hadoop and can only be used to ingest data into HDFS and HBase. Flume is optimised for HDFS operations.
- With Kafka, it is a downside to have to code the producers and consumer applications whereas in Flume, it has many built-in sources and sinks. This means that if existing needs match with Flume features, you’re recommended to use Flume itself to save time.
- Flume can consume data-in-flight with the help of interceptors. It can be important for data masking and filtering whereas Kafka needs an external stream processing system.
- It is possible for Kafka to use Flume as a consumer when we need to ingest data to HDFS and HBase. This means that Kafka and Flume integrates really well.
- Kakfa and Flume can guarantee zero data loss with the correct configuration which is easy to achieve as well. Still, to point out, Flume doesn’t replicate events which means that if one of the Flume nodes fails, we will lose event access until the disk is recovered
Conclusion
In this lesson, we looked at many concepts about Apache Kafka. Read more Kafka based posts here.
]]>Apache Kafka
For a high-level definition, let us present a short definition for Apache Kafka:
Apache Kafka is a distributed, fault-tolerant, horizontally-scalable, commit log.
Those were some high-level words about Apache Kafka. Let us understand the concepts in detail here.
- Distributed: Kafka divides the data it contains into multiple servers and each of these servers is capable of handling requests from clients for the share of data it contains
- Fault-tolerant: Kafka doesn’t have a Single point of Failure. In a SPoF system, like a MySQL database, if the server hosting the database goes down, the application is screwed. In a system which doesnt have a SPoF and consists of multiuple nodes, even if most part of the system goes down, it is still the same for an end user.
- Horizontally-scalable: This kind of scailing refers to adding more machines to existing cluster. This means that Apache Kafka is capable of accepting more nodes in its cluster and providing no down-time for required upgrades to the system. Look at the image below to understand the type of scailing concepts:
- Commit Log: A commit log is a Data Structure just like a Linked List. It appends whatever messages come to it and always maintains their order. Data cannot be deleted from this log until a specified time is reached for that data.

Vertical and Horizontal Scailing
A topic in Apache Kafka is just like a queue where messages are stored. These messages are stored for a configurable amount of time and message is not deleted until this time is achieved, even if it has been consumed by all known consumers.
Kafka is scalable as it is the consumers who actually stores that what message was fetched by them last as an ‘offset’ value. Let’s look at a figure to understand this better:
Topic partion and Consumer offset in Apache Kafka
Getting Started with Apache Kafka
To start using Apache Kafka, it must be installed on the machine. To do this, read Install Apache Kafka on Ubuntu.
Make sure you have an active Kafka installation if you want to try examples we present later in the lesson.
How does it work?
With Kafka, the Producer applications publish messages which arrives at a Kafka Node and not directly to a Consumer. From this Kafka Node, messages are consumed by the Consumer applications.
Kafka Producer and Consumer
As a single topic can get a lot of data at one go, to keep Kafka horizontally scalable, each topic is divided into partitions and each partition can live on any node machine of a cluster. Let us try to present it:
Topic Partitions
Again, Kafka Broker doesn’t keep record of which consumer has consumed how many packets of data. It is the consumers responsibility to keep track of data it has consumed.
Persistence to Disk
Kafka persists the message records it gets from Producers on disk and doesn’t keep them in the memory. A question which might arise is how this makes things feasible and fast? There were several reasons behind this which makes it an optimal way of managing the message records:
- Kafka follows a protocol of grouping the message records. Producers produces messages which are persisted to disk in large chunks and consumers consumes these message records in large linear chunks as well.
- The reason that the disk writes are linear, is that this makes reads fast due to highly decreased linear disk read time.
- Linear disk operations are optimized by Operating Systems as well by using techniques of write-behind and read-ahead.
- Modern OS also use the concept of Pagecaching which means that they cache some disk data in Free available RAM.
- As Kafka persists data in a uniform standard data in the whole flow from producer till consumer, it makes use of the zero-copy optimization process.
Data Distribution & Replication
As we studied above that a topic is divided into partitions, each message record is replicated on multiple nodes of the cluster to maintain the order and data of each record in case one of the node dies.
Even though a partition is replicated on multiple nodes, there still is a partition leader node through which applications read and write data on the topic and the leader replicates data on other nodes, which are termed as followers of that partition.
If the message record data is highly important to an application, the guarantee of the message record to be safe in one of the nodes can be increased by increasing the replication factor of the Cluster.
What is Zookeeper?
Zookeeper is a highly fault-tolerant, distributed key-value store. Apache Kafka heavily depends on Zookeeper to store cluster mechanics like the heartbeat, distributing updates/configurations, etc).
It allows the Kafka brokers to subscribe to itself and know whenever any change regarding a partition leader and node distribution has happened.
Producer and Consumers applications directly communicate with Zookeeper application to know which node is the partition leader for a topic so that they can perform reads and writes from the partition leader.
Streaming
A Stream Processor is a main component in a Kafka cluster which takes a continual stream of message record data from input topics, process this data and creates a stream of data to output topics which can be anything, from trash to a Database.
It is completely possible to perform simple processing directly using the producer/consumer APIs, though for complex processing like combining streams, Kafka provides an integrated Streams API library but please note that this API is meant to be used within our own codebase and it doesn’t run on a broker. It works similar to the consumer API and helps us scale out the stream processing work over multiple applications.
When to use Apache Kafka?
As we studied in above sections, Apache Kafka can be used to deal with a large number of message records which can belong to a virtually infinite number of topics in our systems.
Apache Kafka is an ideal candidate when it comes to using a service which can allow us to follow event-driven architecture in our applications. This is due to its capabilities of data persistence, fault-tolerant and highly distributed architecture where critical applications can rely on its performance.
The scalable and distributed architecture of Kafka makes integration with microservices very easy and enables an application to decouple itself with a lot of business logic.
Creating a new Topic
We can create a test Topic testing on Apache Kafka server with the following command:
Creatinig a Topic
--partitions 1 --topic testing
Here is what we get back with this command:

Create New Kafka Topic
A testing topic will be created which we can confirm with the mentioned command:
Kafka Topic creation confirmation
Writing Messages on a Topic
As we studied earlier, one of the APIs present in Apache Kafka is the Producer API. We will use this API to create a new message and publish to the topic we just created:
Writing Message to Topic
Let’s see the output for this command:

Publish message to Kafka Topic
Once we press key, we will see a new arrow (>) sign which means we can inout data now:

Typing a message
Just type in something and press to start a new line. I typed in 3 lines of texts:
Reading Messages from Topic
Now that we have published a message on the Kafka Topic we created, this message will be there for some configurable time. We can read it now using the Consumer API:
Reading Messages from Topic
topic testing --from-beginning
Here is what we get back with this command:

Command to read Message from Kafka Topic
We will be able to see the messages or lines we have written using the Producer API as shown below:
If we write another new message using the Producer API, it will also be displayed instantly on the Consumer side:
Publish and Consumption at the same time
Conclusion
In this lesson, we looked at how we start using Apache Kafka which is an excellent Message Broker and can act as a special data persistence unit as well.
]]>Installing Apache Kafka
First update the package repository cache of your Ubuntu server with the following command:

The package repository cache should be updated.

Apache Kafka depends on Java. You can install OpenJDK 8 on Ubuntu 17.10 from the official package repository.
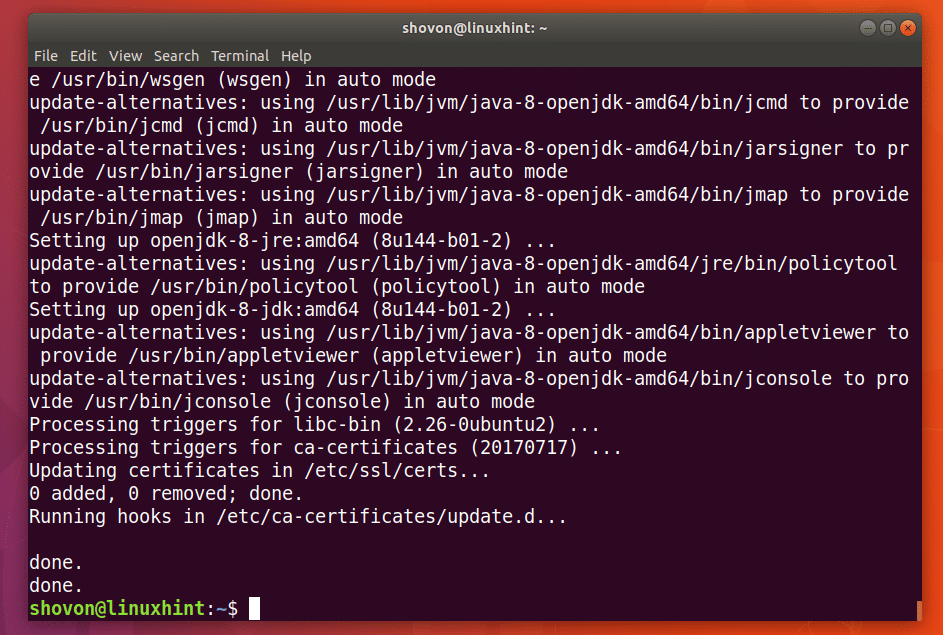
Run the following command to install OpenJDK 8 on Ubuntu 17.10:

Now press ‘y’ and then press <Enter> to continue.

OpenJDK 8 should be installed.
Now you have to install zookeeper. It is available in the official package repository of Ubuntu.
To install zookeeper, run the following command:

Now press ‘y’ and then press <Enter> to continue.

zookeeper should be installed.
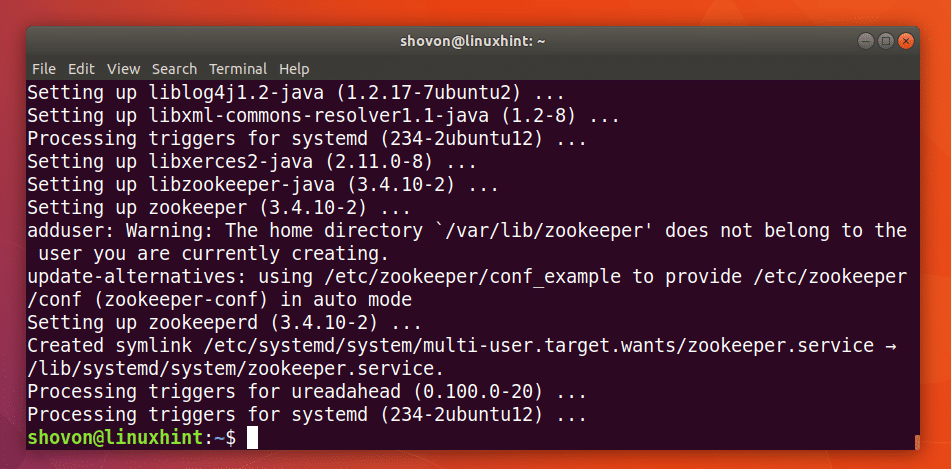
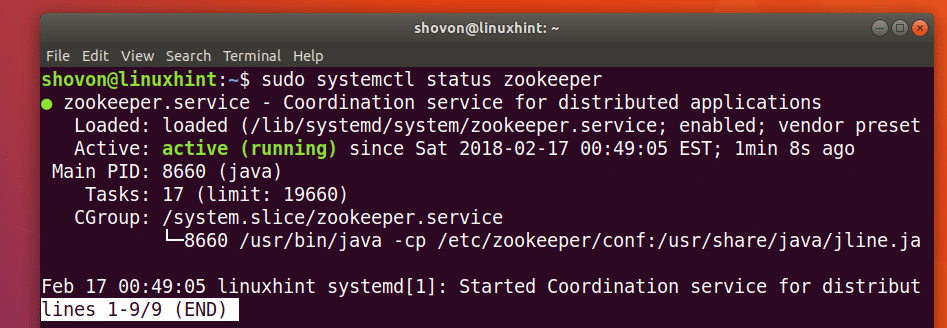
You can run the following command to check whether zookeeper is running:
As you can see from the screenshot below, zookeeper is running.
If it’s not running on your machine for some reason, you can start zookeeper with the following command:

You should add zookeeper to the system startup. So it will start automatically on boot.
Run the following command to add zookeeper to the system startup:

zookeeper should be added to the system startup as you can see from the screenshot below.

I need netstat command which is provided by the net-tools package.
Now install net-tools package with the following command:

net-tools package should be installed.

Now you can run the following command to check whether zookeeper is running on port 2181.
As you can see it is running on port 2181.

Now run the following command to navigate to the ~/Downloads/ directory in your users HOME directory:

Now you have to Download Apache Kafka. At the time of writing, the latest version of Apache Kafka is v1.0.0.
Run the following command to download Apache Kafka 1.0.0 with wget:

Apache Kafka compressed archive should be downloaded.

As you can see from the output of ls command, the filename of Apache Kafka archive is kafka_2.12-1.0.0.tgz

Now create a directory Kafka/ in the /opt directory with the following command:
A directory /opt/Kafka should be created. This is where I will extract the archive.

Now extract the Apache Kafka archive in the /opt/Kafka directory with the following command:

The archive should be extracted.

You can run the following command to check the directory name:
Note that directory name.

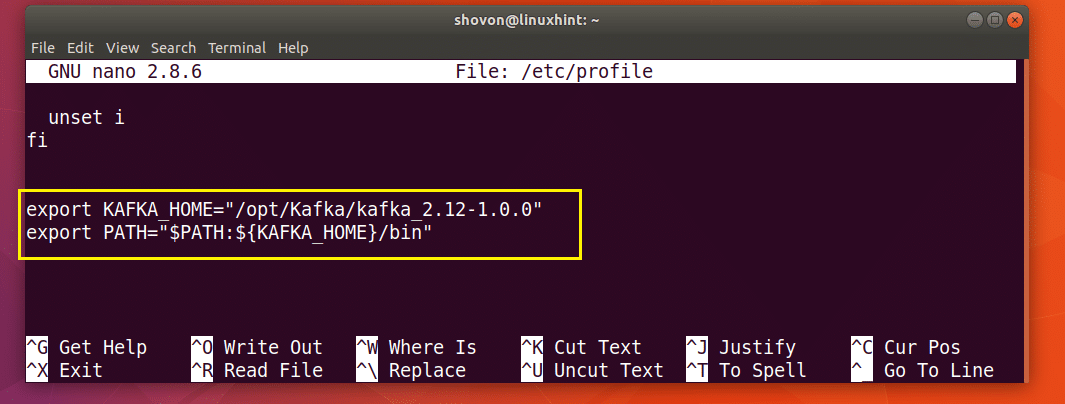
Now open /etc/profile with the following command:

Add the following lines to the end of the file and save it.
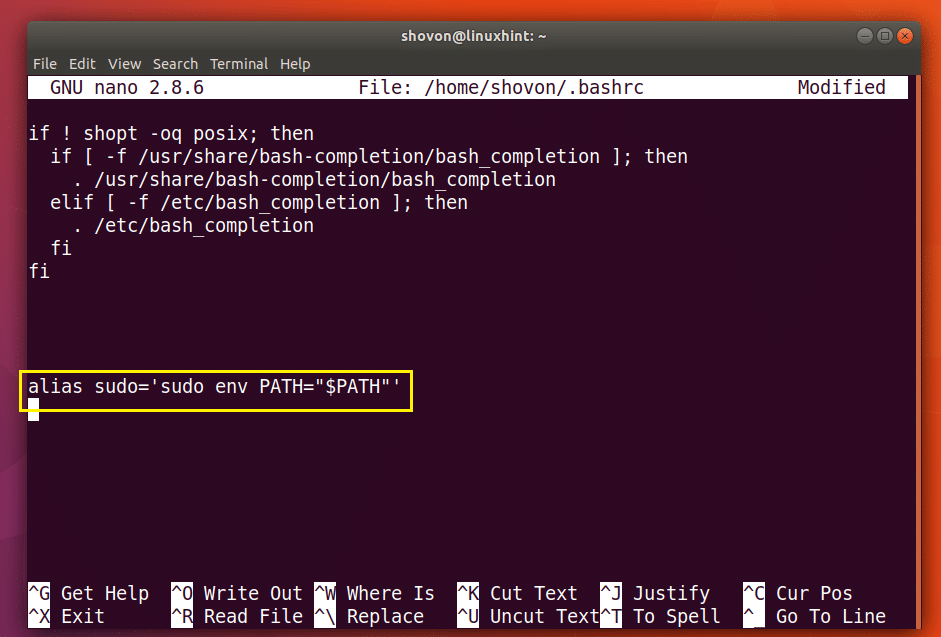
Now open the ~/.bashrc file with the following command:

Add the marked line to the end of the file as save it.
Now restart your computer with the following command:

Once your computer starts, you can check whether the environment variables are added as follows:


Now for making our life easier, make a symbolic link of Kafka server.properties file as follows:

As you can see from the screenshot below, the symbolic link is created.

Now you can start Apache Kafka server with the following command:

Apache Kafka server should be started.

Testing Apache Kafka Server
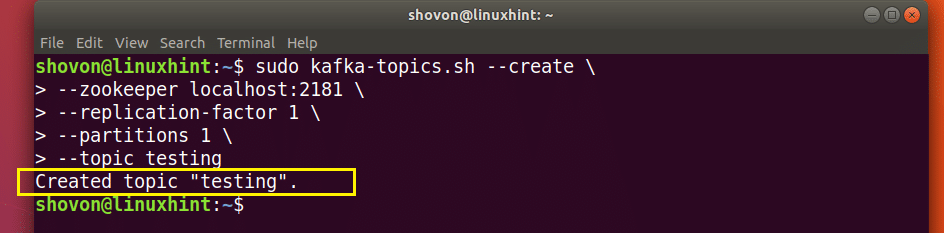
You can create a test Topic testing on Apache Kafka server with the following command:
--partitions 1 --topic testing
A testing topic should be created as shown in the screenshot below.
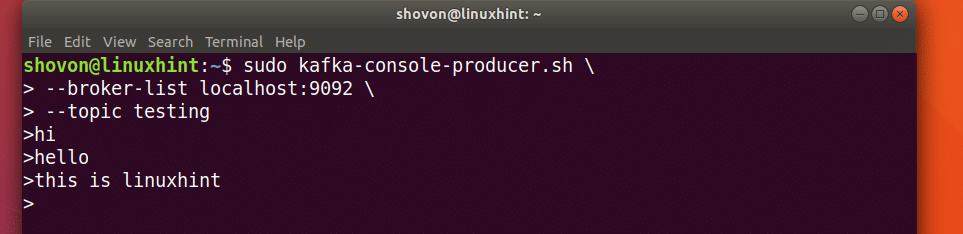
Now run the following command to use Kafka Producer API to send some message to the testing topic:
Once you press <Enter> you should see a new arrow (>) sign as shown in the screenshot below.
Just type in something and press <Enter> to start a new line. I typed in 3 lines of texts.
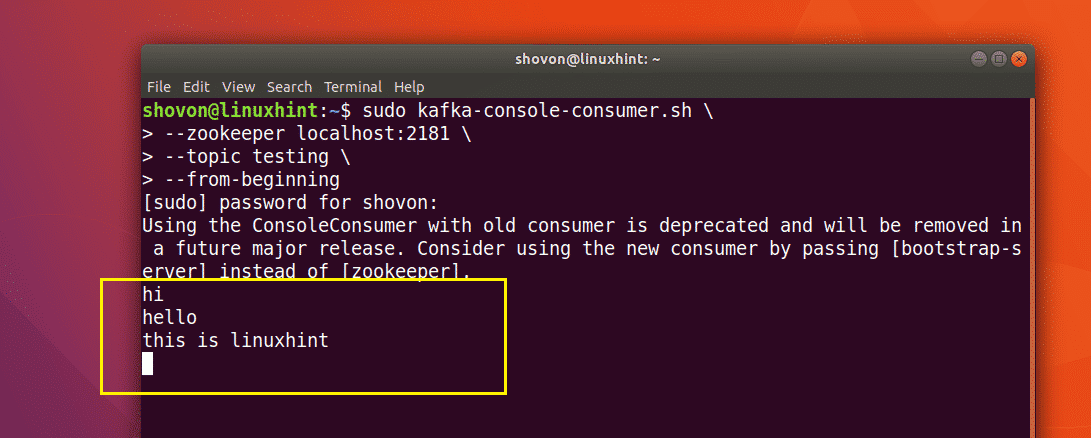
Now you can use the Kafka Consumer API to fetch the messages/lines from the testing topic with the following command:
topic testing --from-beginning
You should be able to see the messages or lines you have written using the Producer API as marked in the screenshot below.
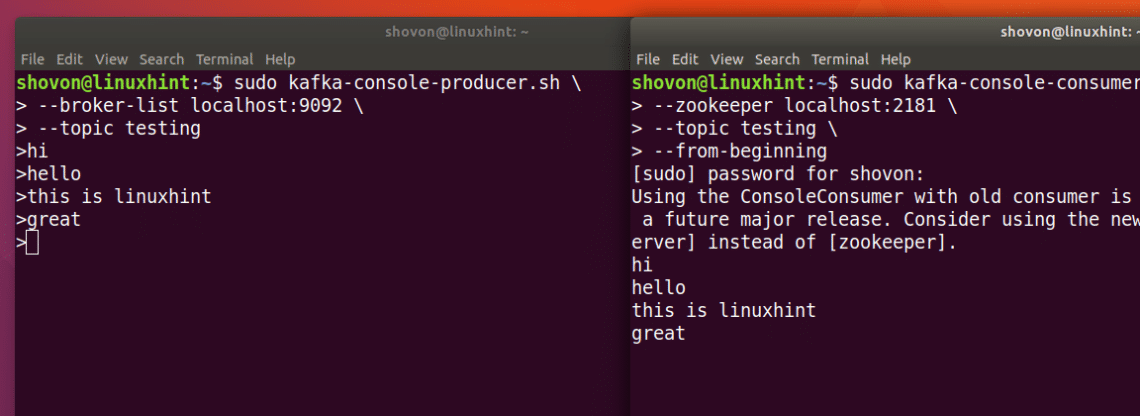
If you write a new message using the Producer API, it should also be displayed instantly on the Consumer side as shown in the screenshot below.
So that’s how you install Apache Kafka and verify its working on Ubuntu 17.10 Artful Aardvark. Thanks for reading this article.
]]>